
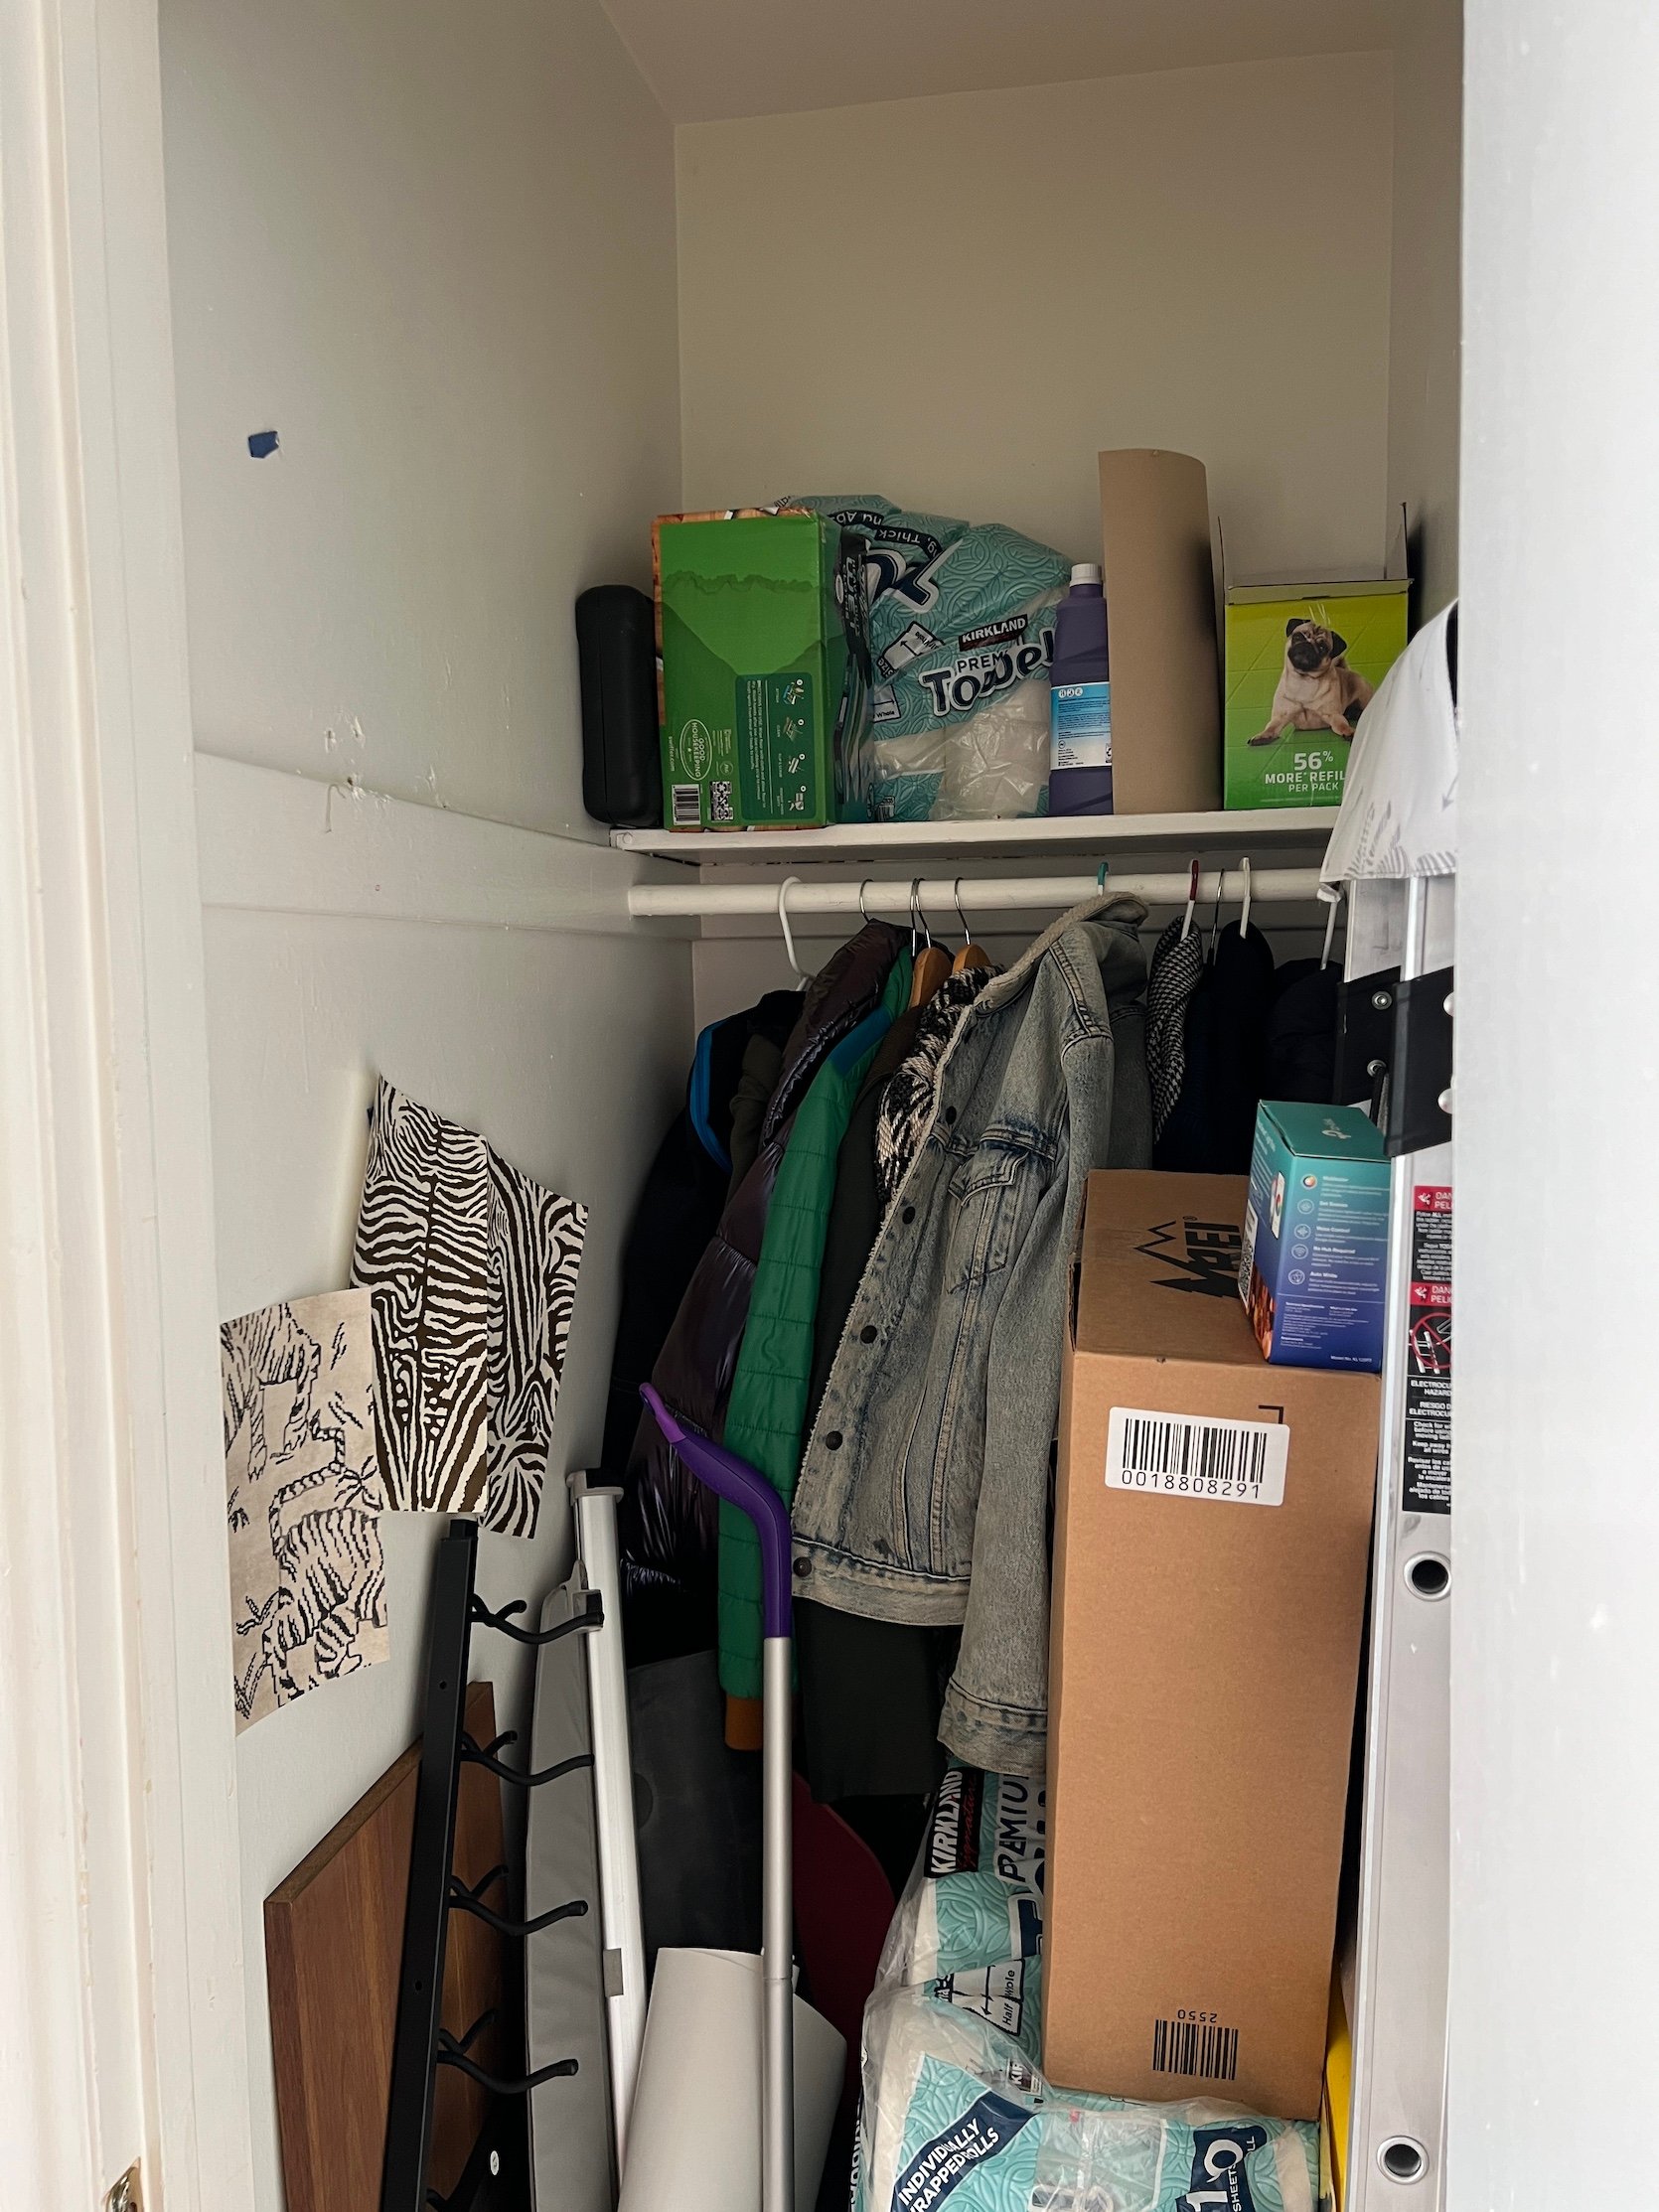
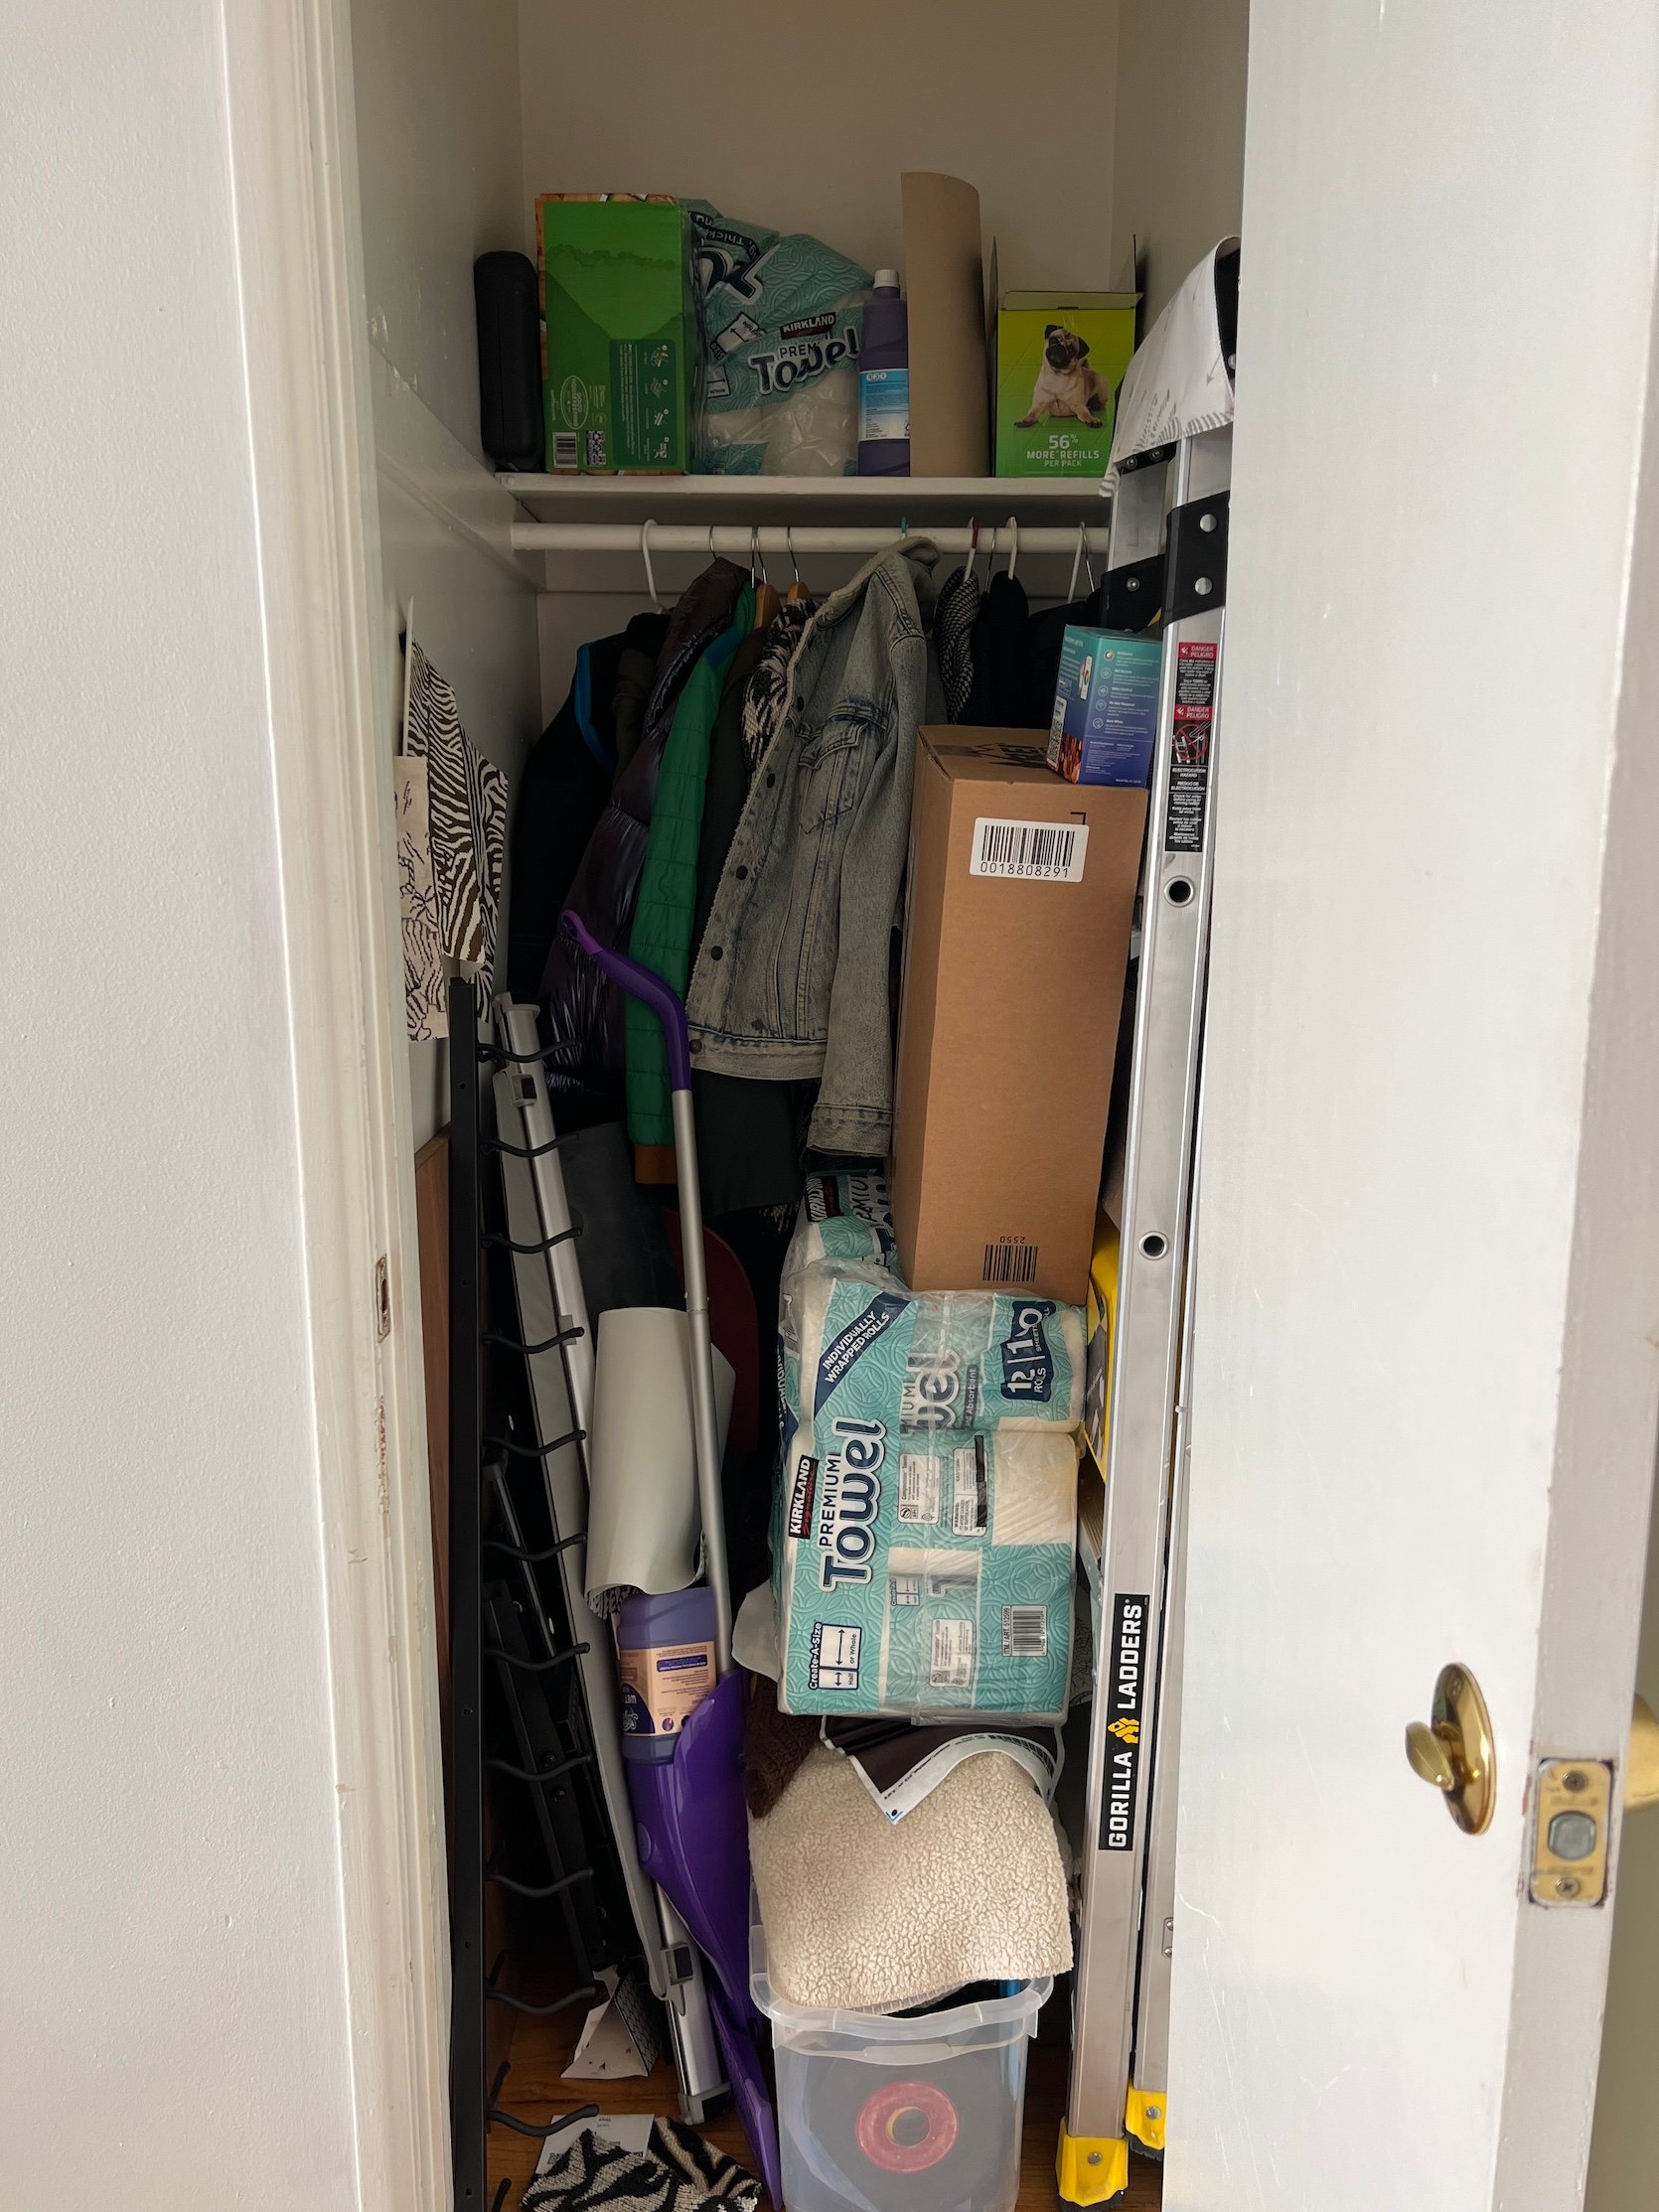
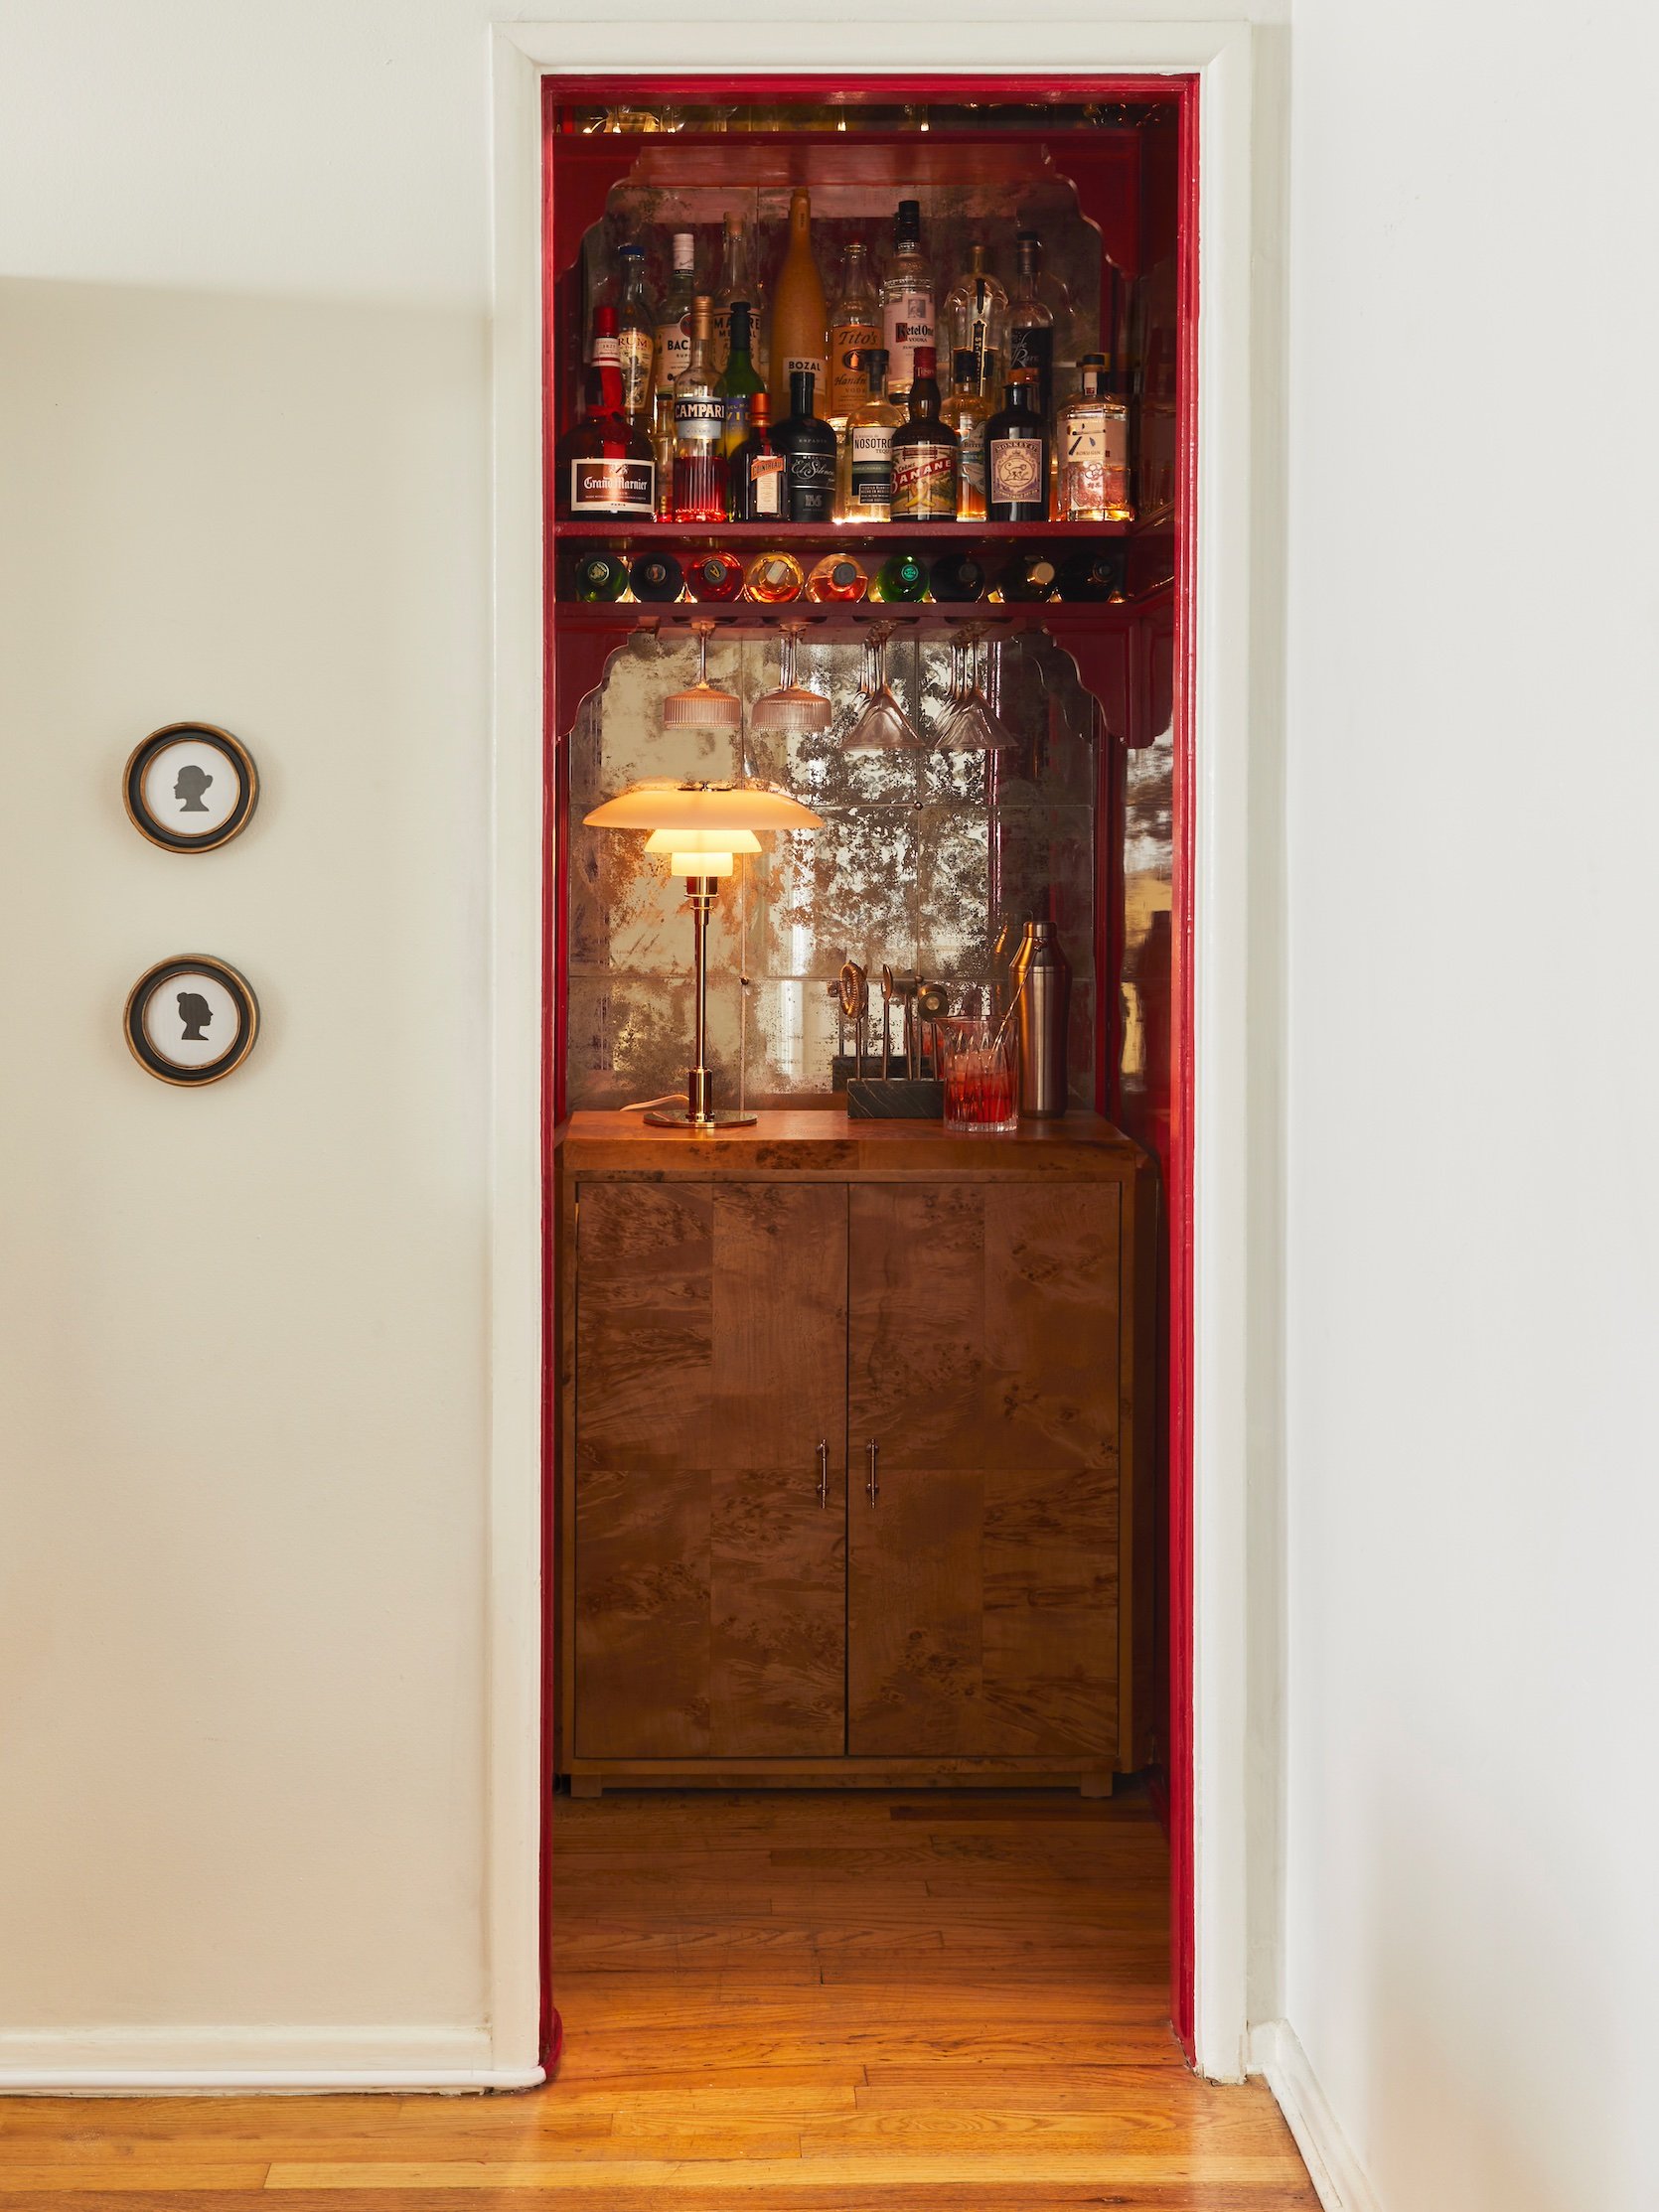
Spoiler alert: this might just be my favorite project I’ve ever done. But before I show you everything, let me back it up a bit and tell you how it all came to be. My living room (which was just revealed!!) and dining room (which is coming soon to the blog!) are open to each other, and smack in the middle of the two spaces is this coat closet. It’s your average closet – truly nothing special. It’s filled with coats, ladders, extra toilet paper, the works. Nothing glamorous and all the stuff that needs hiding. Super functional, but we have a fairly large closet and some cabinets in the hallway, so it wasn’t totally necessary.
Yup, confirmed this is your average, unorganized coat closet. Living room is to the left, and the dining room is to the right. While it was nice to have extra storage, and I could’ve just organized this space and left it as is, there was another issue I was having. Our kitchen (which is so cute and full of vintage tile) is charming but tiny. Like it barely fits a tiny fridge. So we hardly have enough space to store food in there – but barware and alcohol bottles?? FORGET ABOUT IT! It truly was a disaster when it came to bar storage, and I was desperate to find literally any solution.
During COVID, everyone had their little hobbies they picked up – whether it was baking bread, getting into calligraphy, or what have you – and learning to make craft cocktails was mine. I also LOVE to host, and therefore I love to have a full bar so that when people come over, I can make literally whatever they want. Negroni? Done. Feeling more of a margarita vibe? Coming right up. Oh, you want a martini? Shaken or stirred, baby? That’s the energy we like to have when guests come over, and hey, it’s cheaper than hanging out at your neighborhood bar, so why not incentivise cocktails at home?
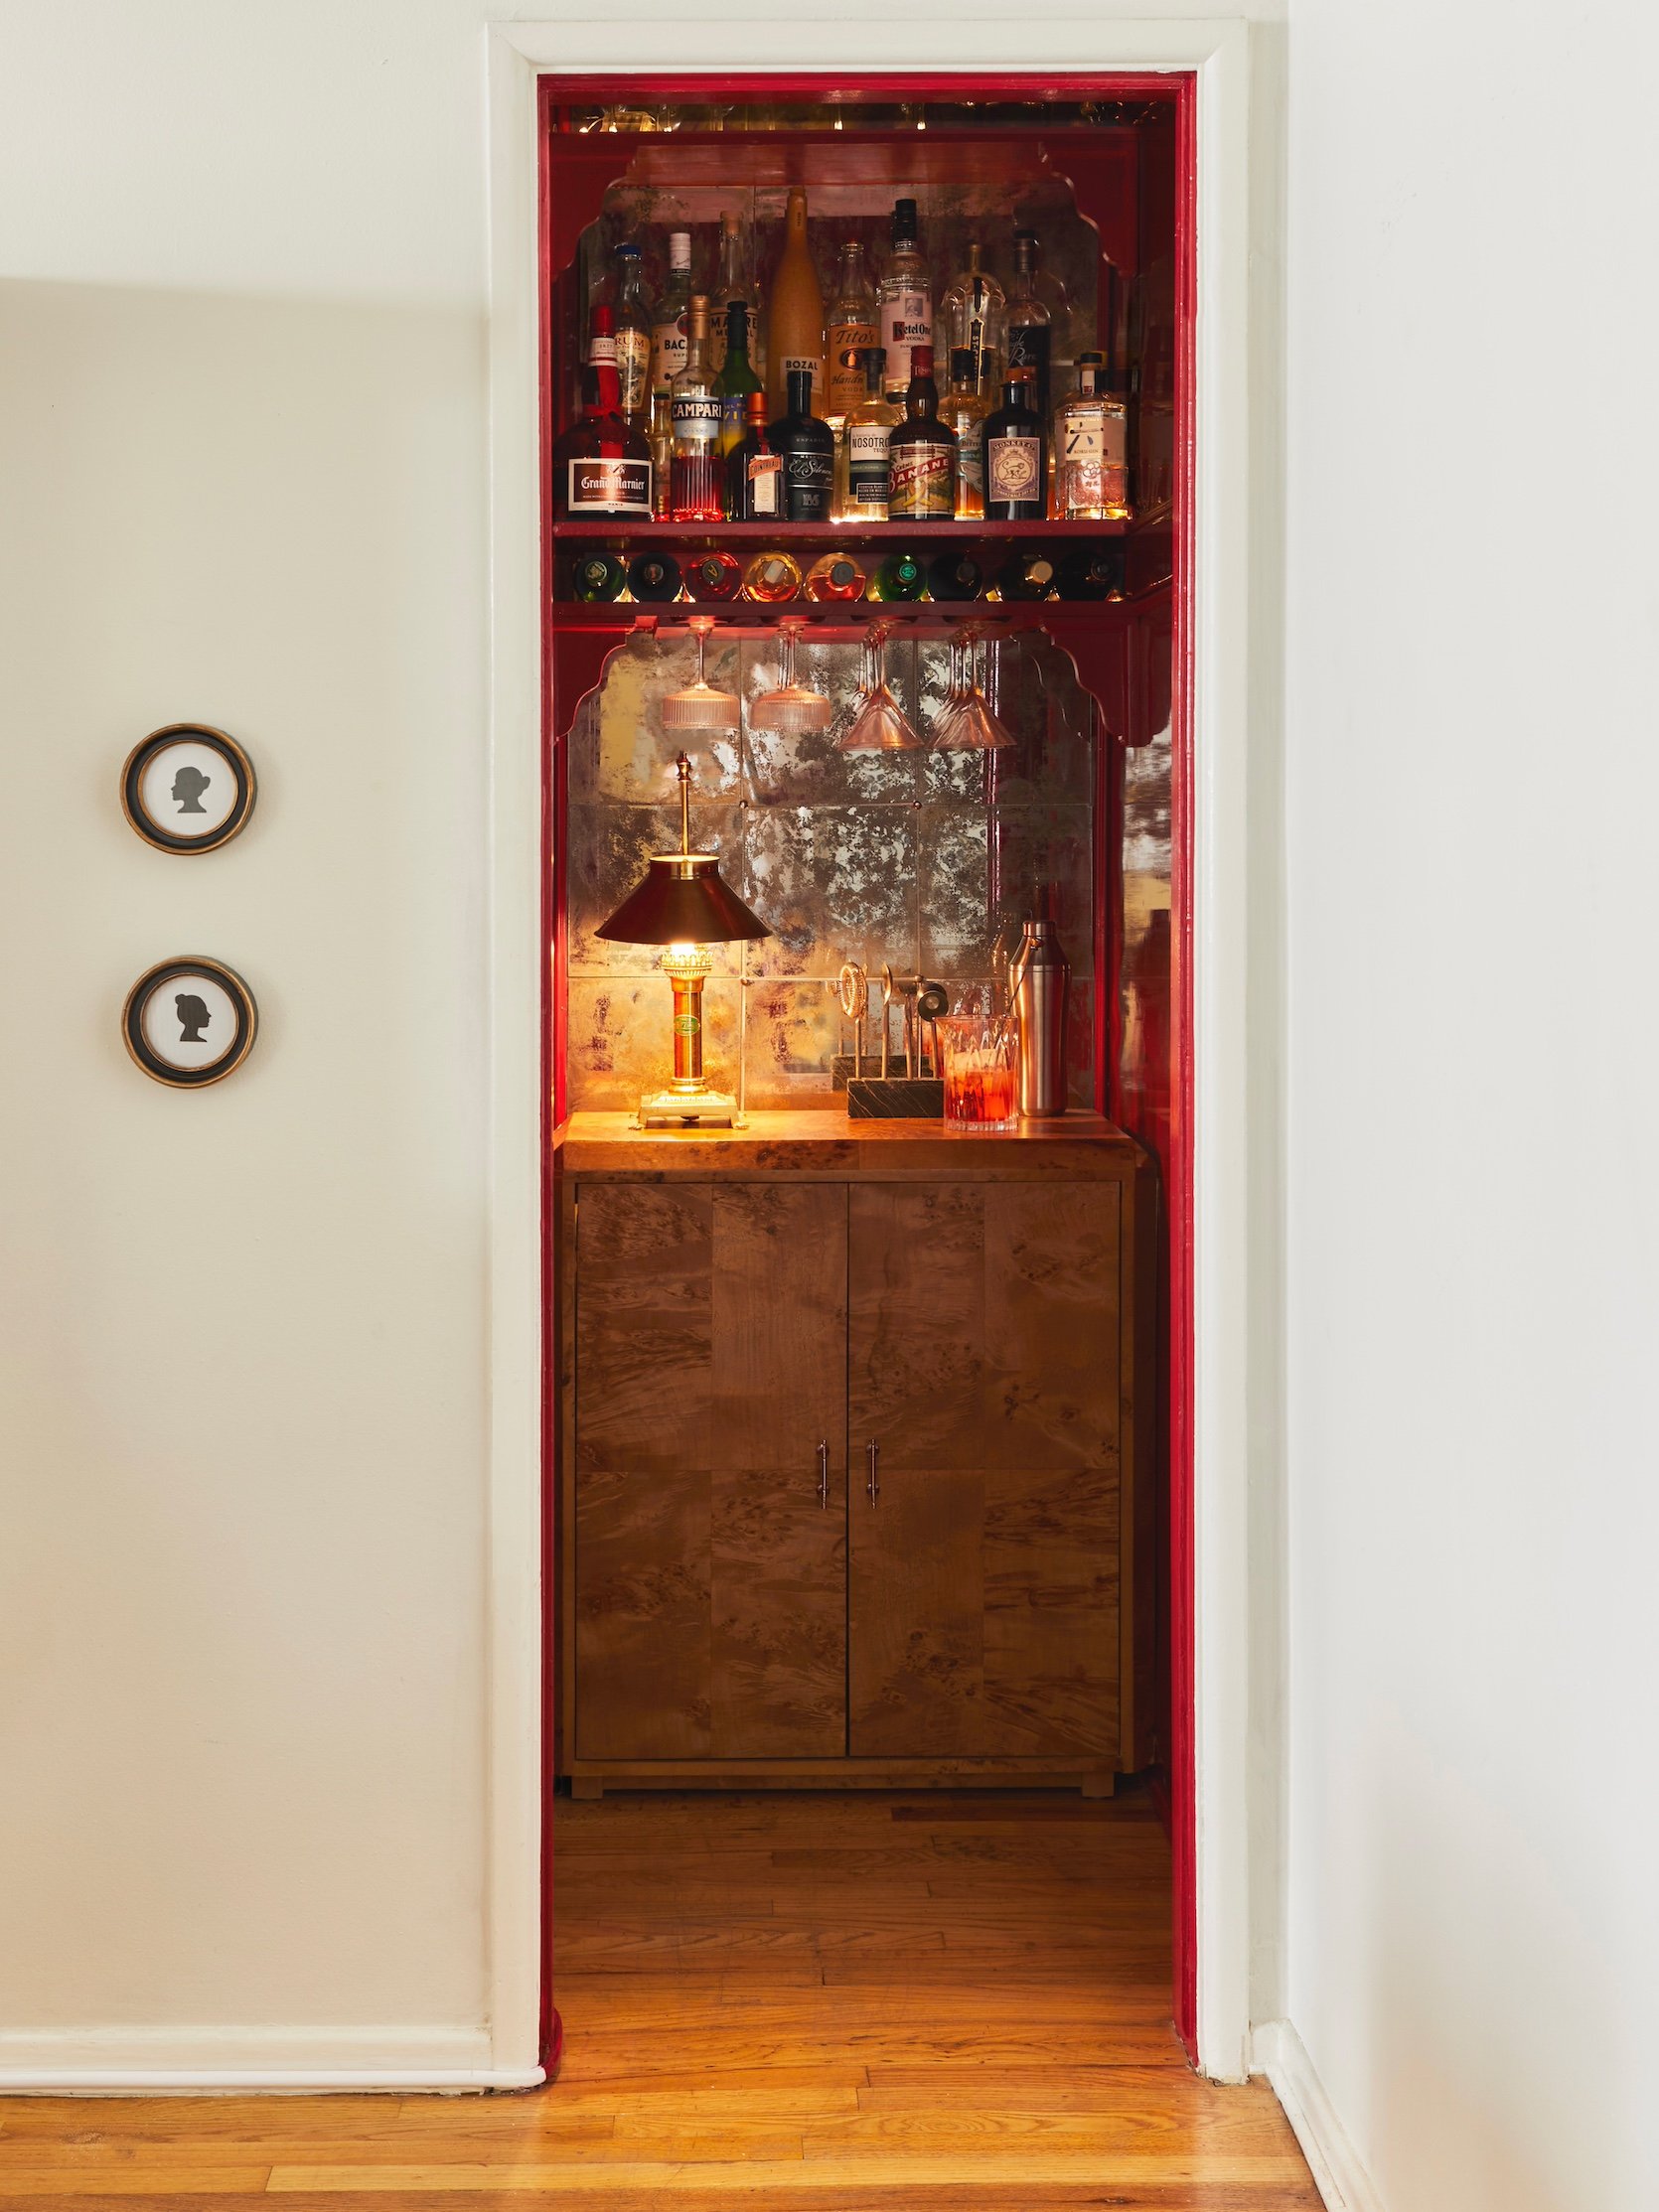
But yeah…storing a full bar in my itty bitty kitchen? There was no way. Plus, I hated the idea of people coming over for a dinner party where I’m cooking and then everyone pops into said tiny kitchen to grab a drink. What can I say, I like my space when I’m prepping food!! I want my guests to be able to grab a drink, sit on the couch, and not come near if the stove is on fire, haha. So I started doing some thinking…and I thunk and thunk and finally thought…wait, is that a key for a door handle on that coat closet?? Imagine if that key opened up to a little speakeasy…
so that’s exactly what I did…
Lamp | Silhouette Art Frames | Cabinet
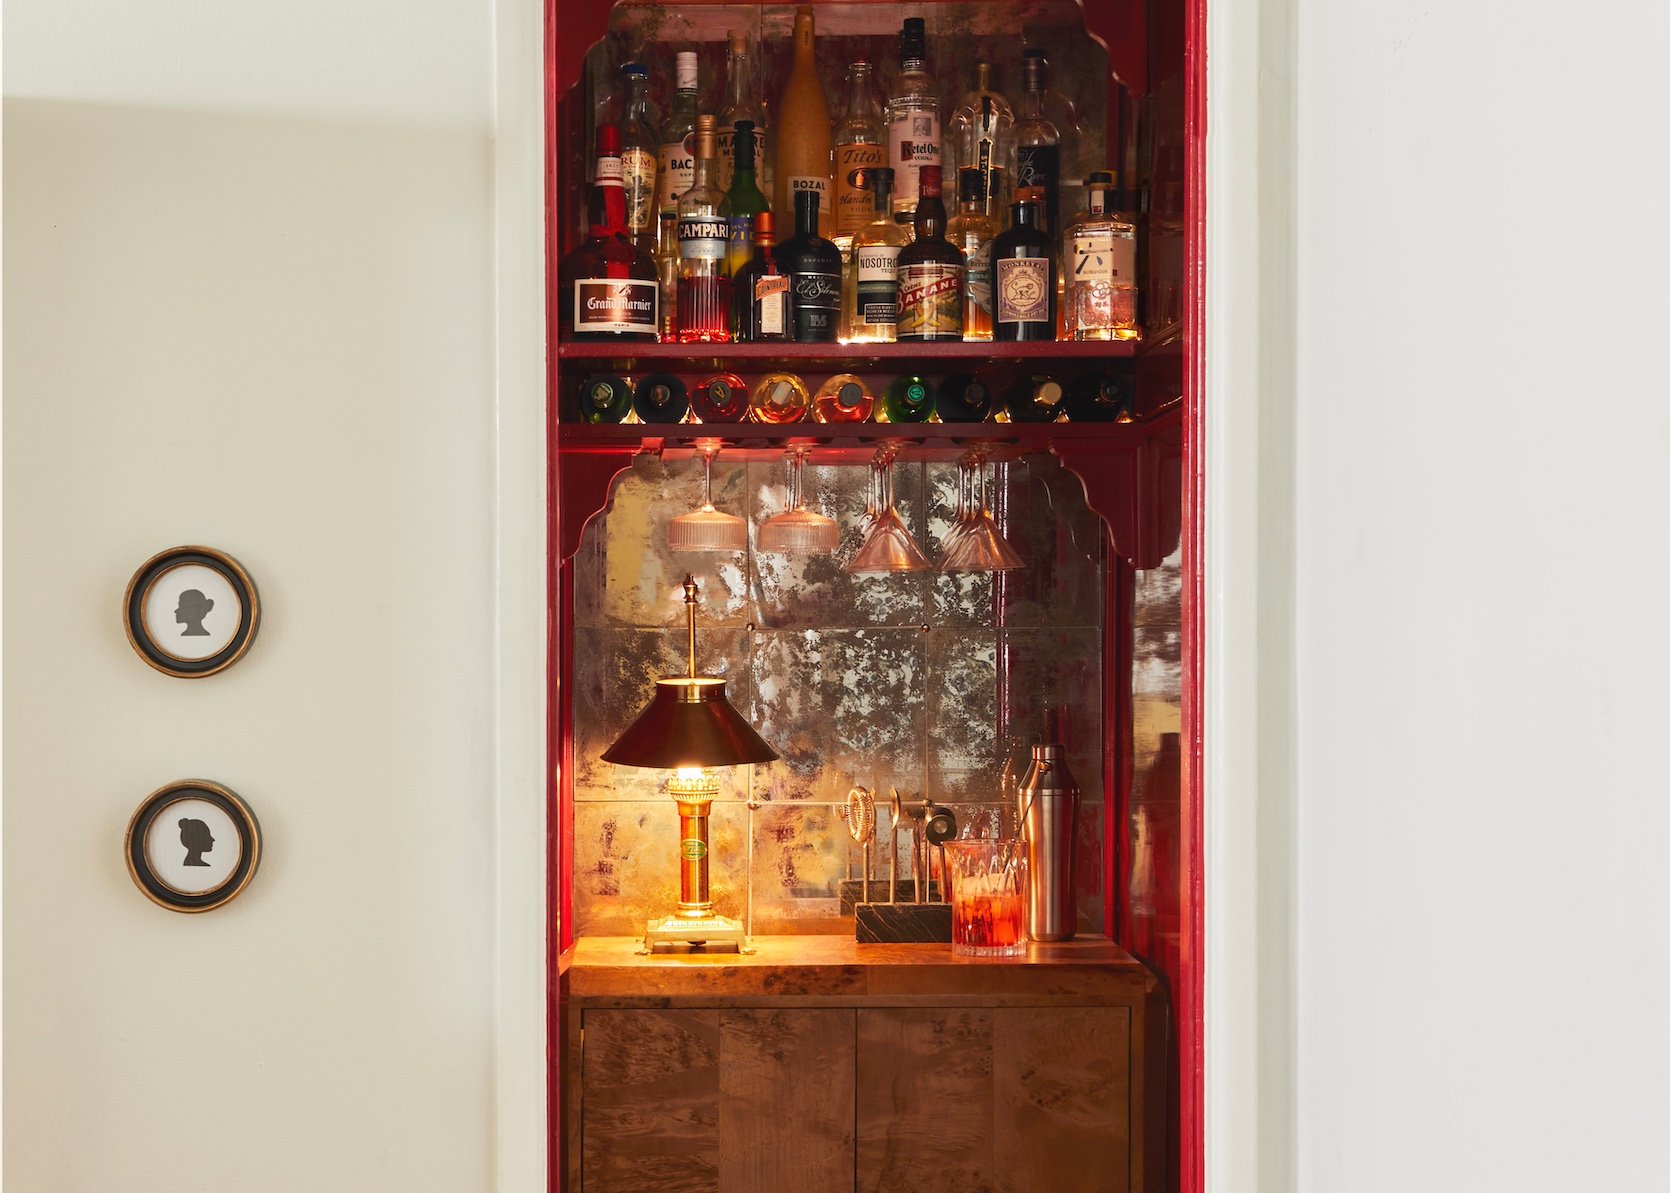
Except I ended up taking the door off because it was too much work and too pretty to not look at all the time – so I still call it “The Closet Speakeasy” but it is fully open to anyone who walks in!! Honestly, sometimes I still debate putting this door back on, but we have a cute mirror outside the door, so it just kind of gets in the way…see below:
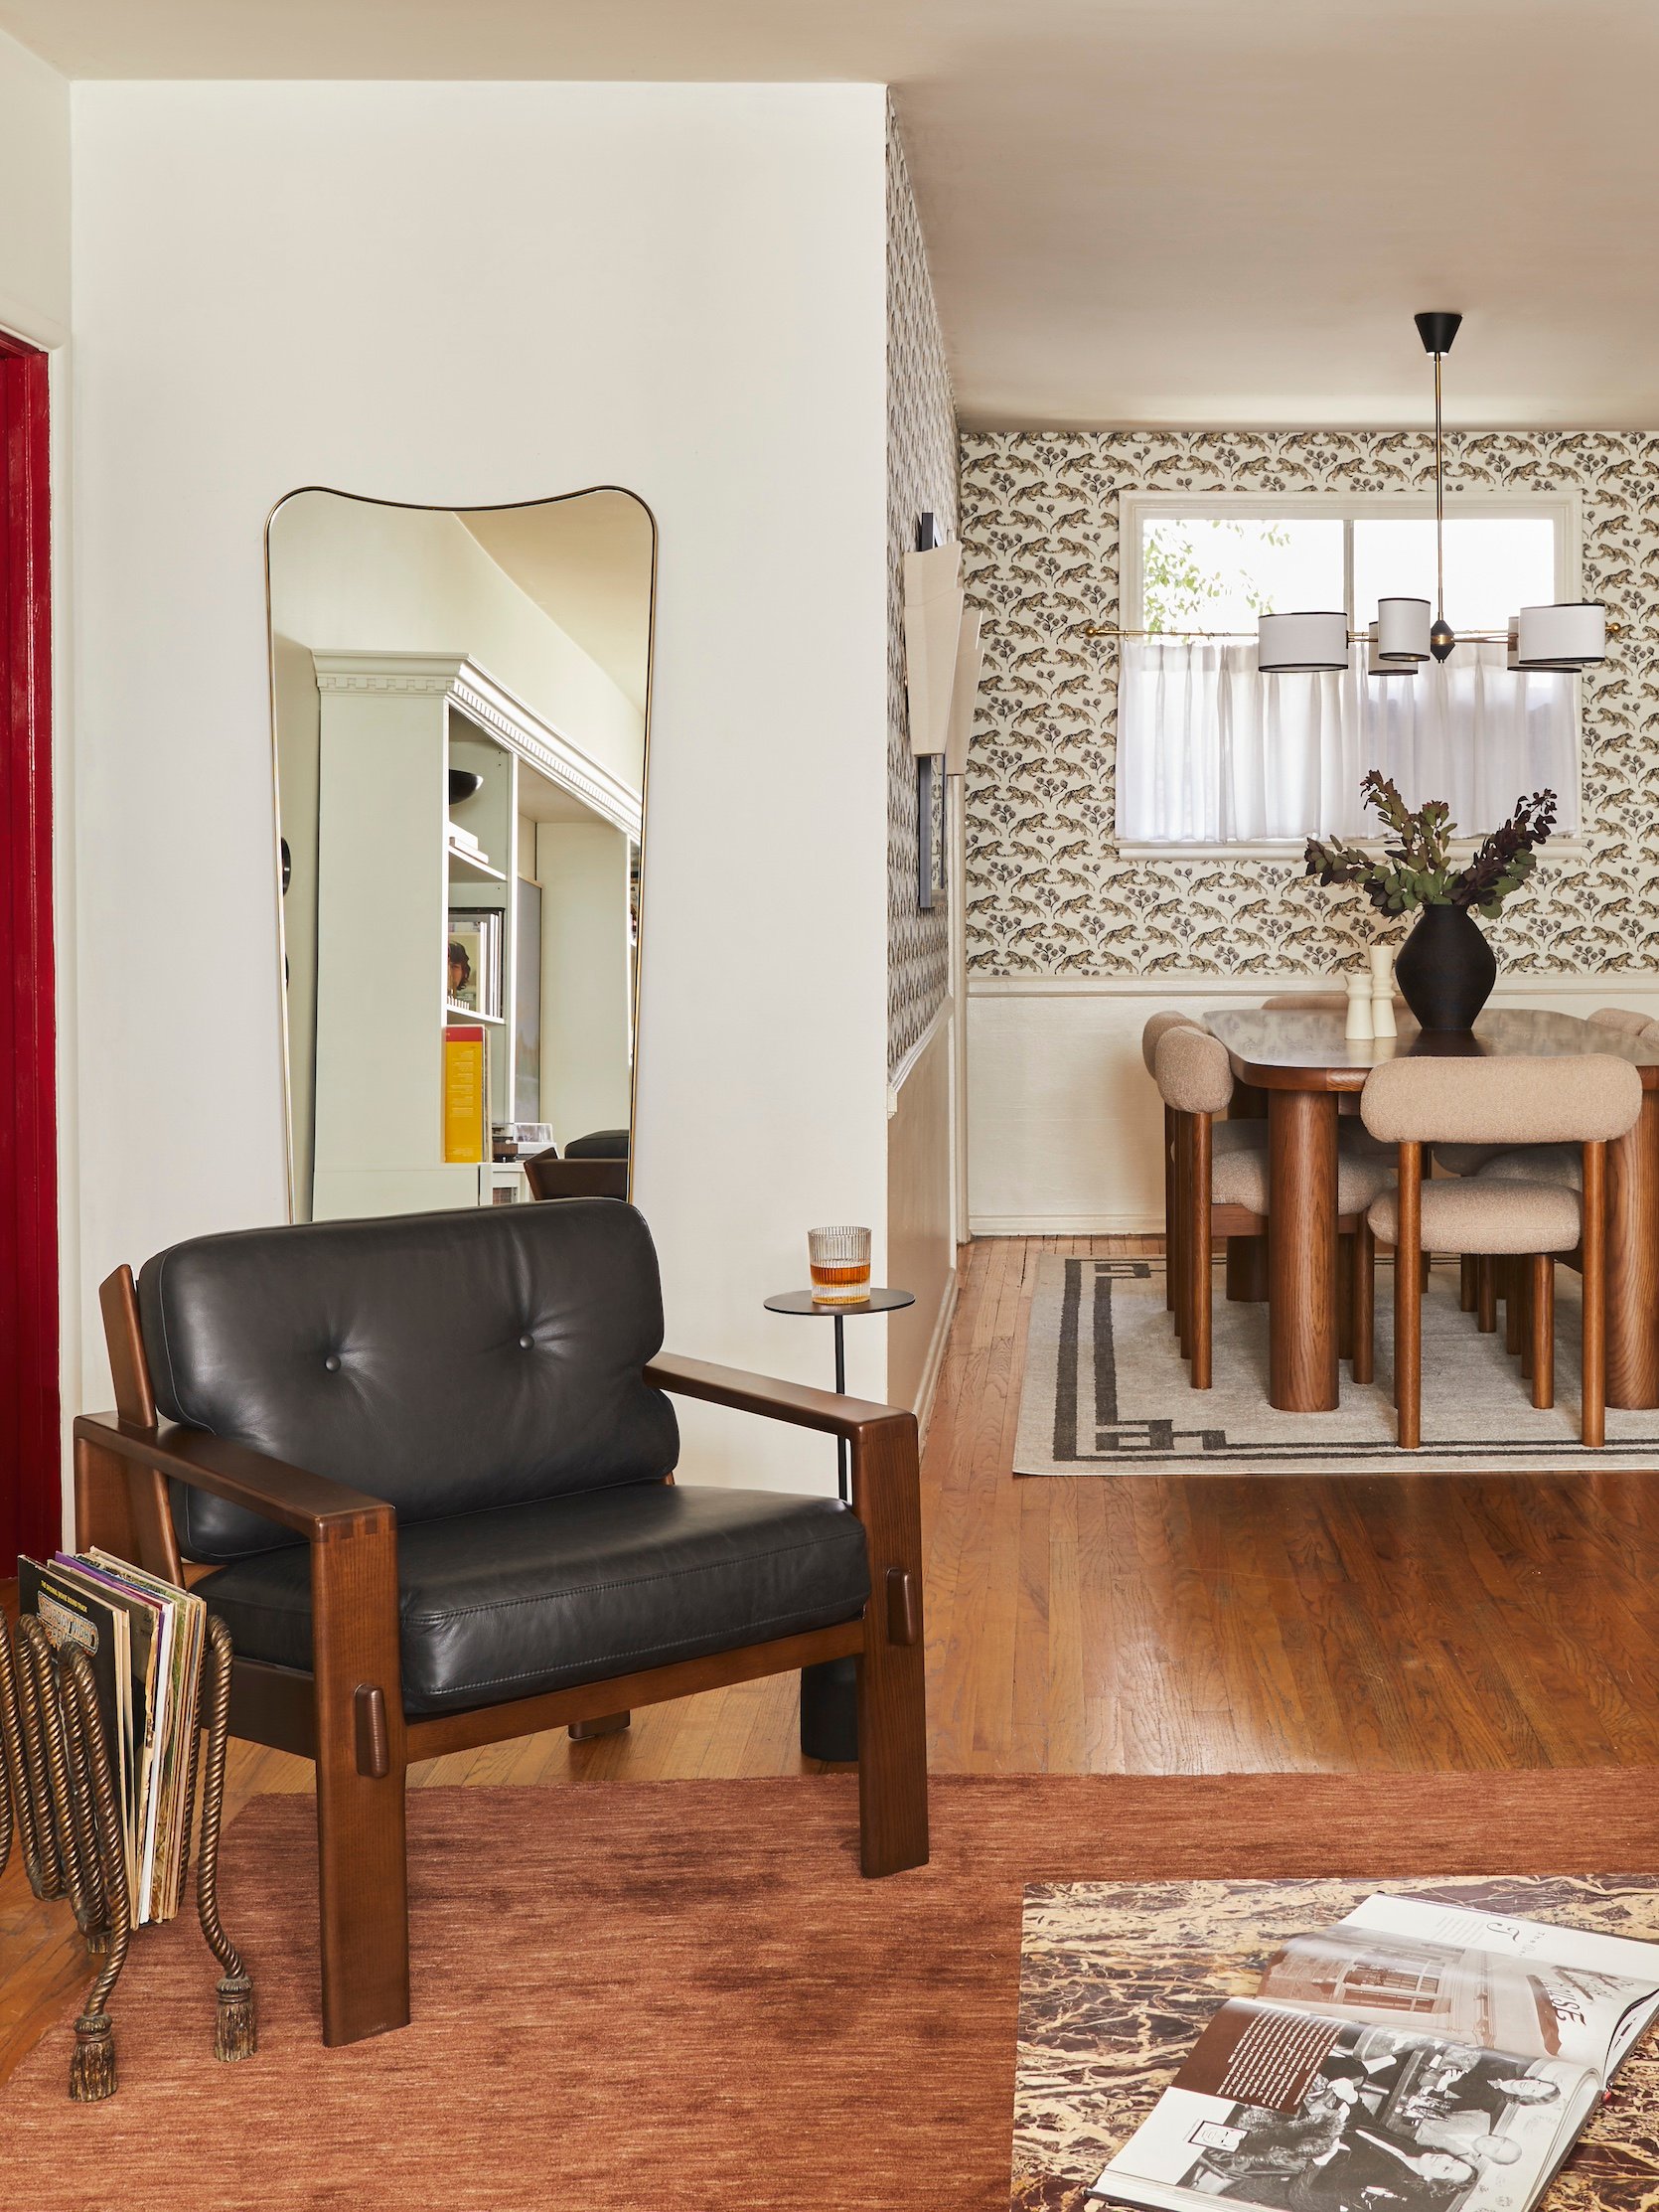
Leather Chair | Rug | Drink Table | Dining Chairs | Mirror | Dining Room Rug | Wallpaper | Coffee Table | Chandelier
And then now that my living room is finished, this is what it looks like right outside the closet door! I did a DIY bookcase situation that I’m absolutely obsessed with. The whole space just feels way more pulled together now.
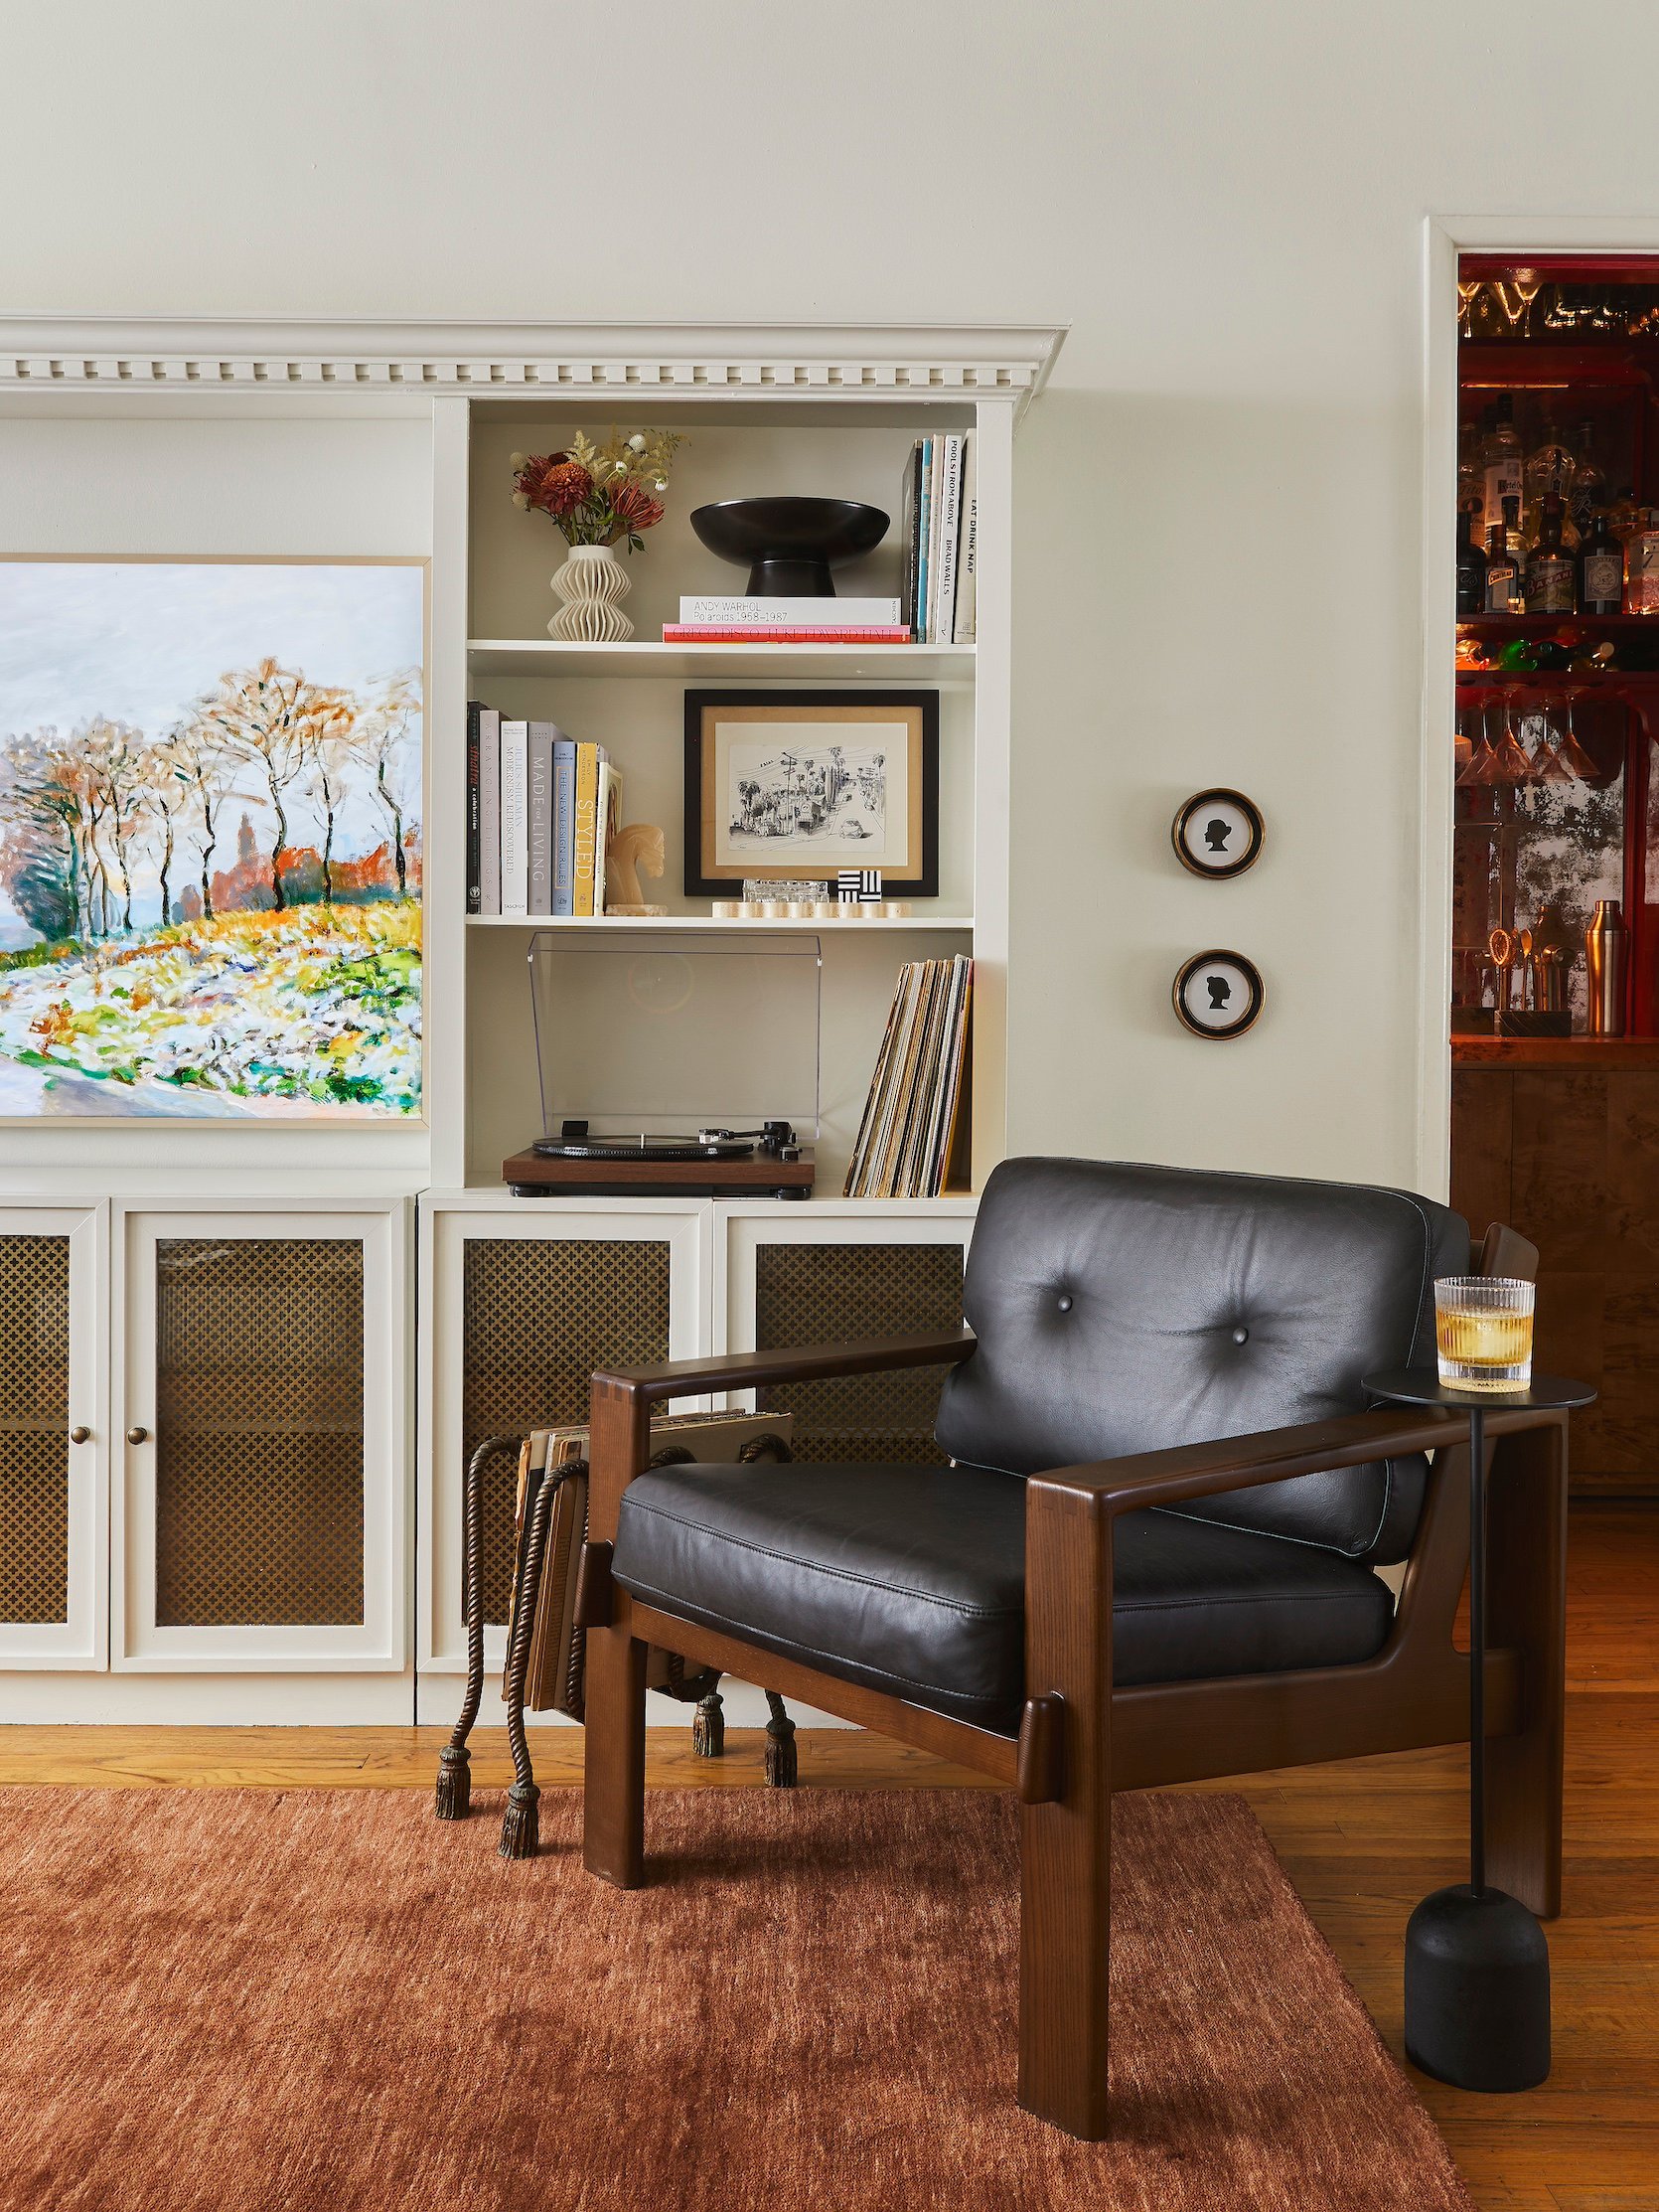
Leather Chair | Rug | Drink Table | Black Bowl | Silhouette Art Frames | DIY Bookcase
It’s actually comical because I had this idea for the closet speakeasy and HAD to do it. I created this closet before I had a real dining table, which is so hilarious and shows questionable priorities. So yeah, this was the first space I finished in my apartment, and it only took 2 months, but let me tell you it was certainly more of a thing than I was expecting (it always is, isn’t it?)
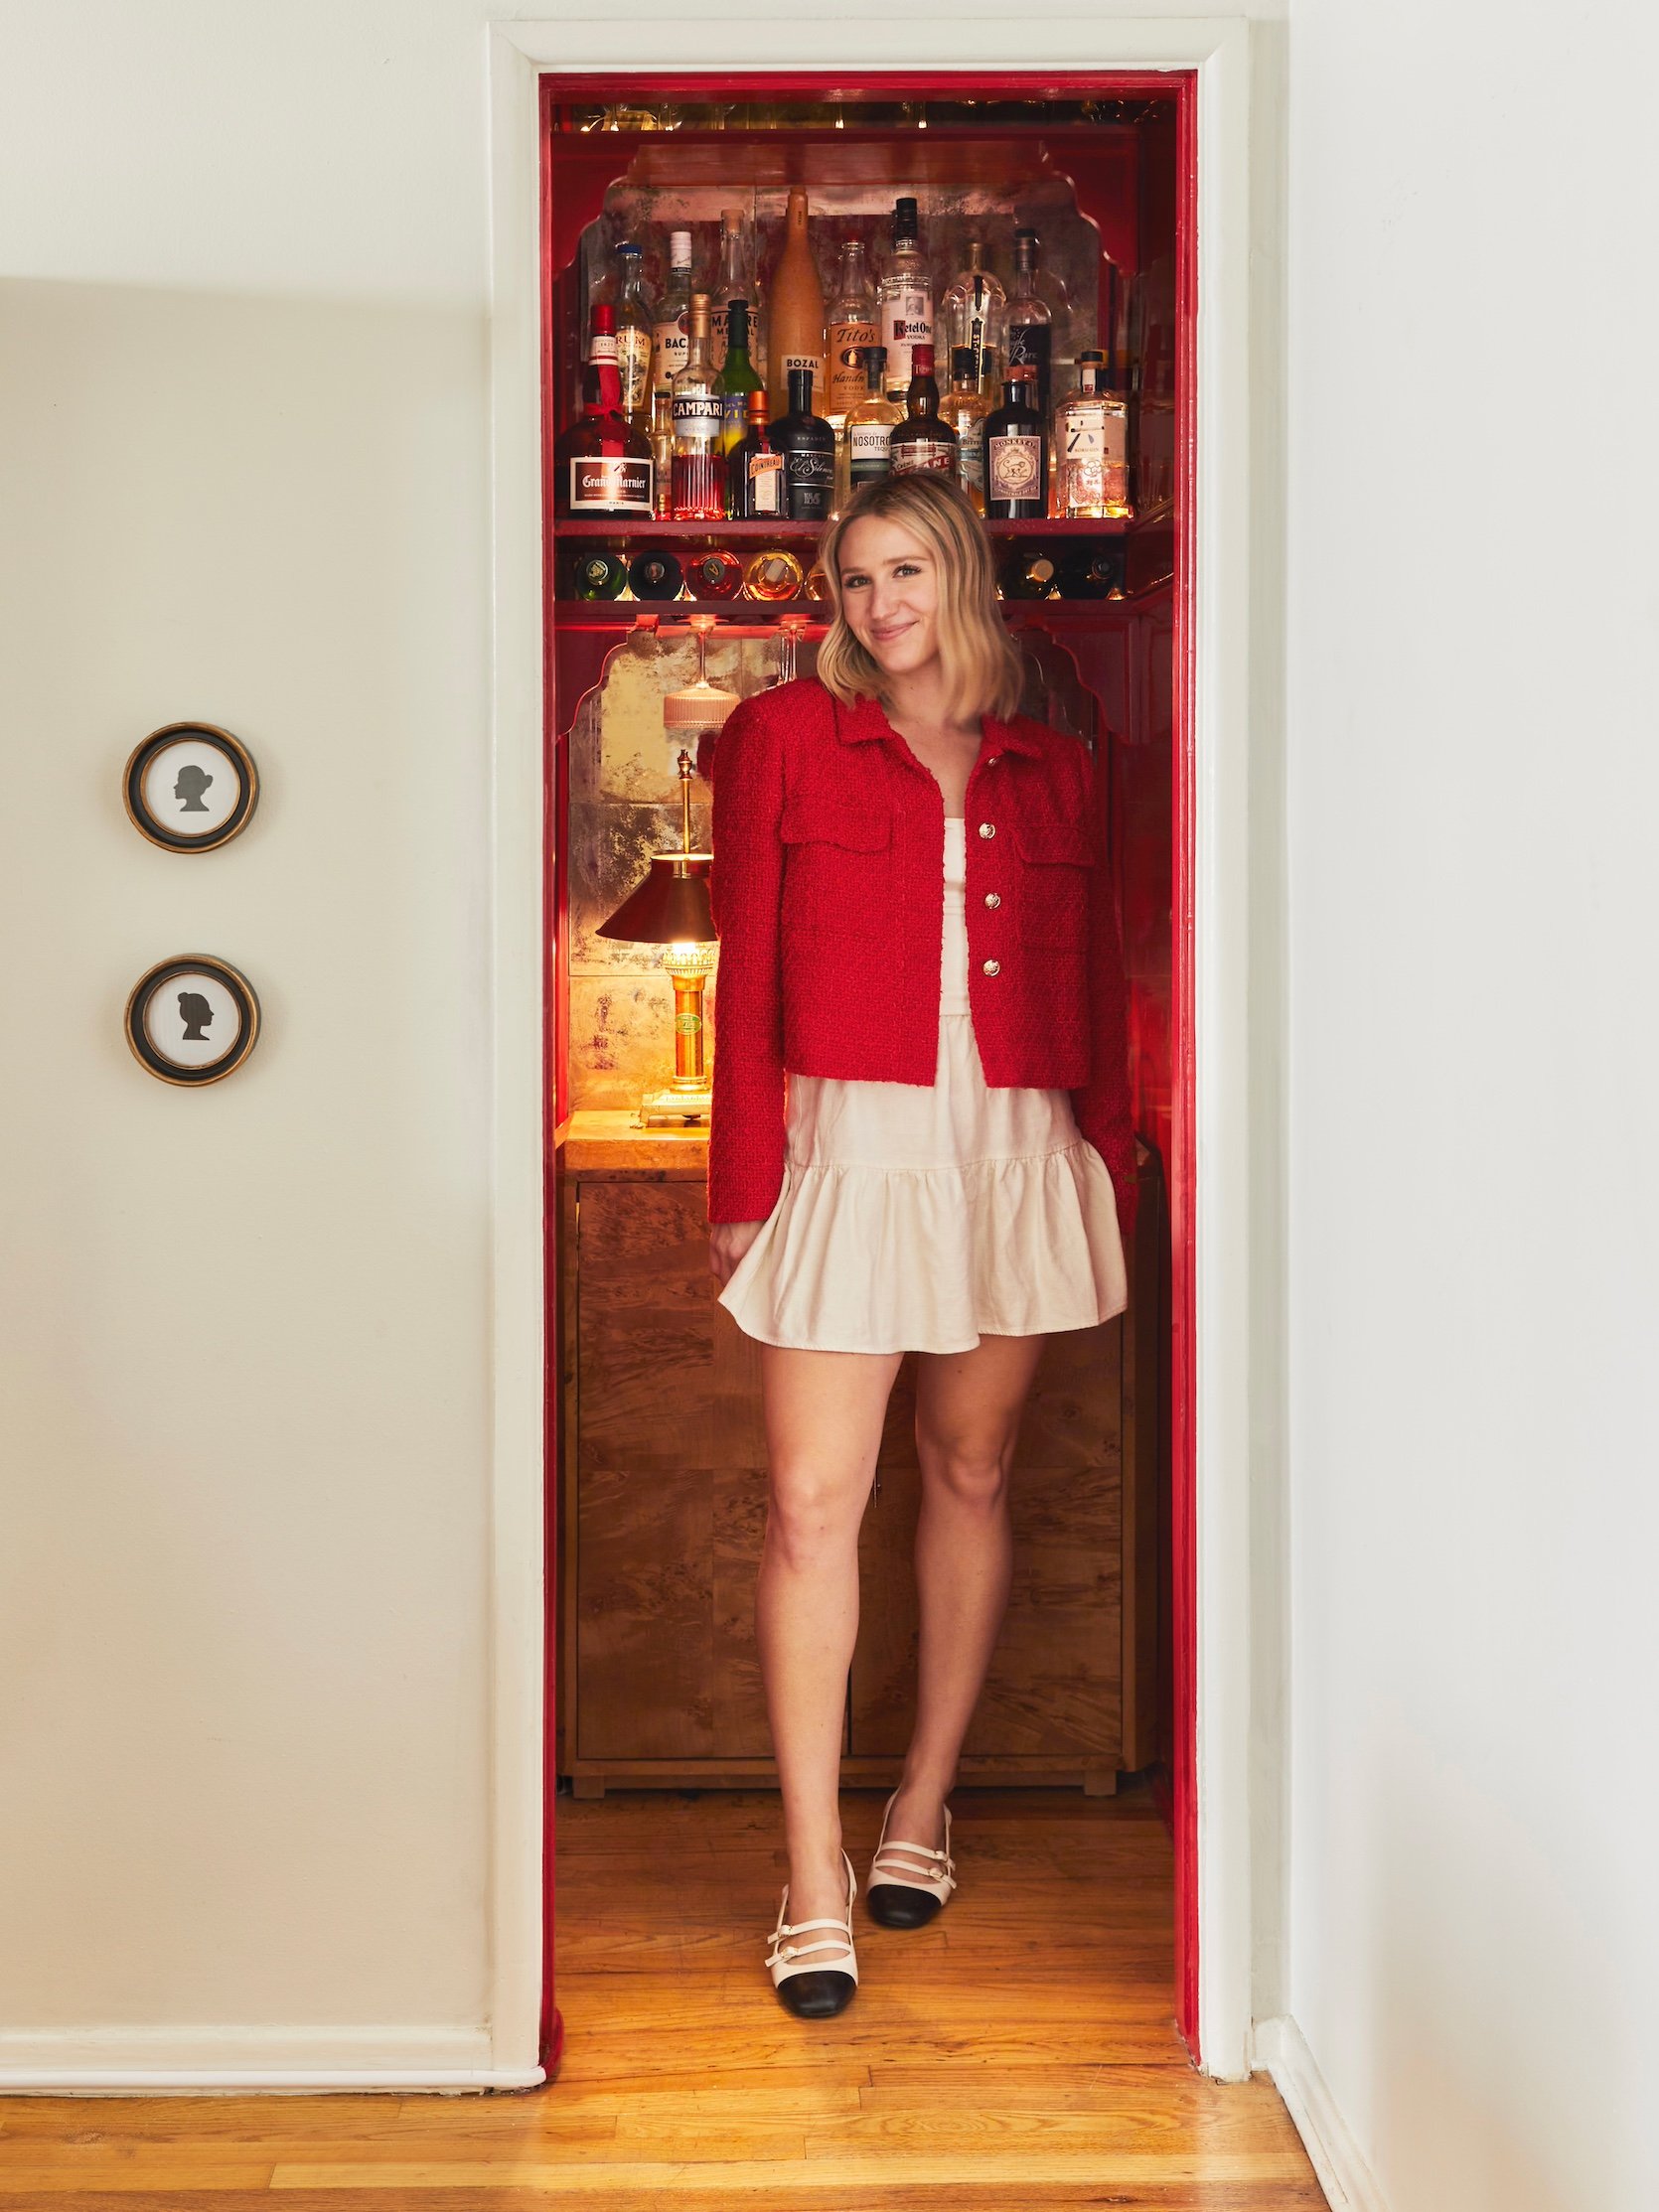
Jacket | Skirt (unavailable) | Shirt (unavailable) | Shoes
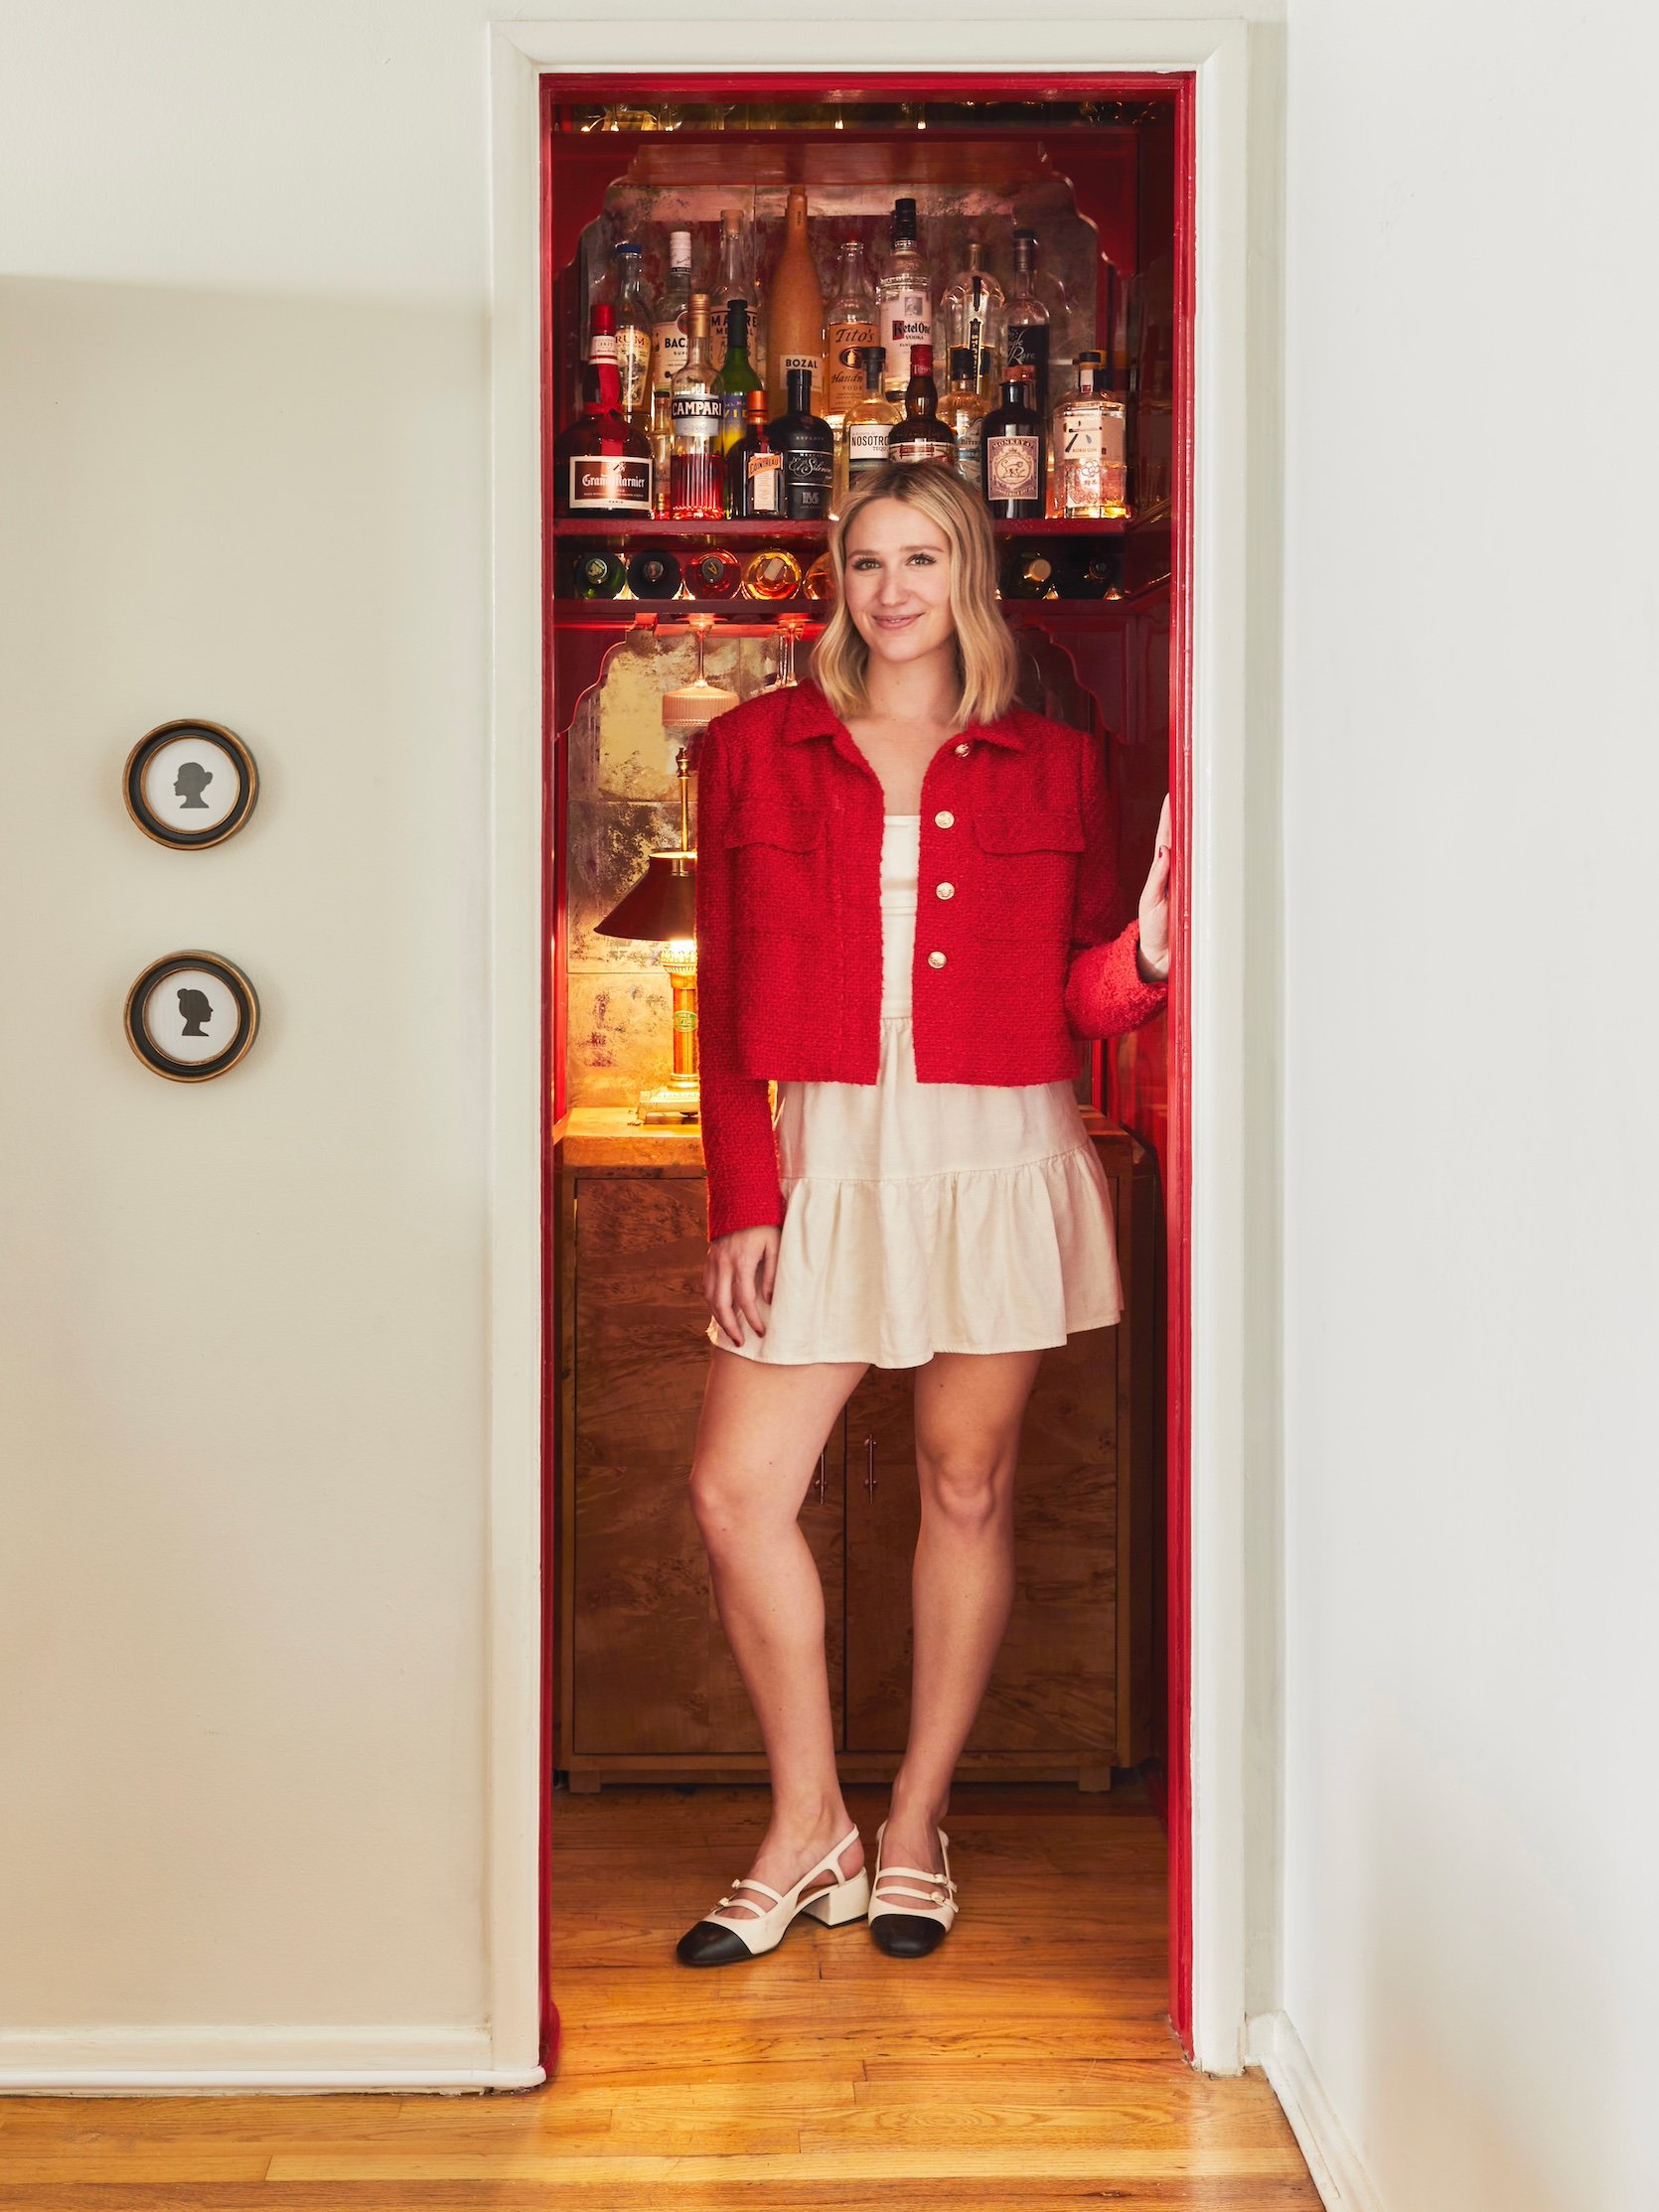
Person for scale! Hi! My main inspiration was the wine bar at the Parker Palm Springs – if you haven’t been, it’s iconic (also, I’m clearly very obsessed with The Parker as it was also a major source of inspiration for my 500 sqft studio apartment). It’s an ultra sexy, low-ceilinged wine bar that fits about 20 people, maybe 30 max. I love the intimacy and knew I could create something similar in this very intimate closet bar, which seats 1 or 2 max if you’re playing 7 minutes in heaven.
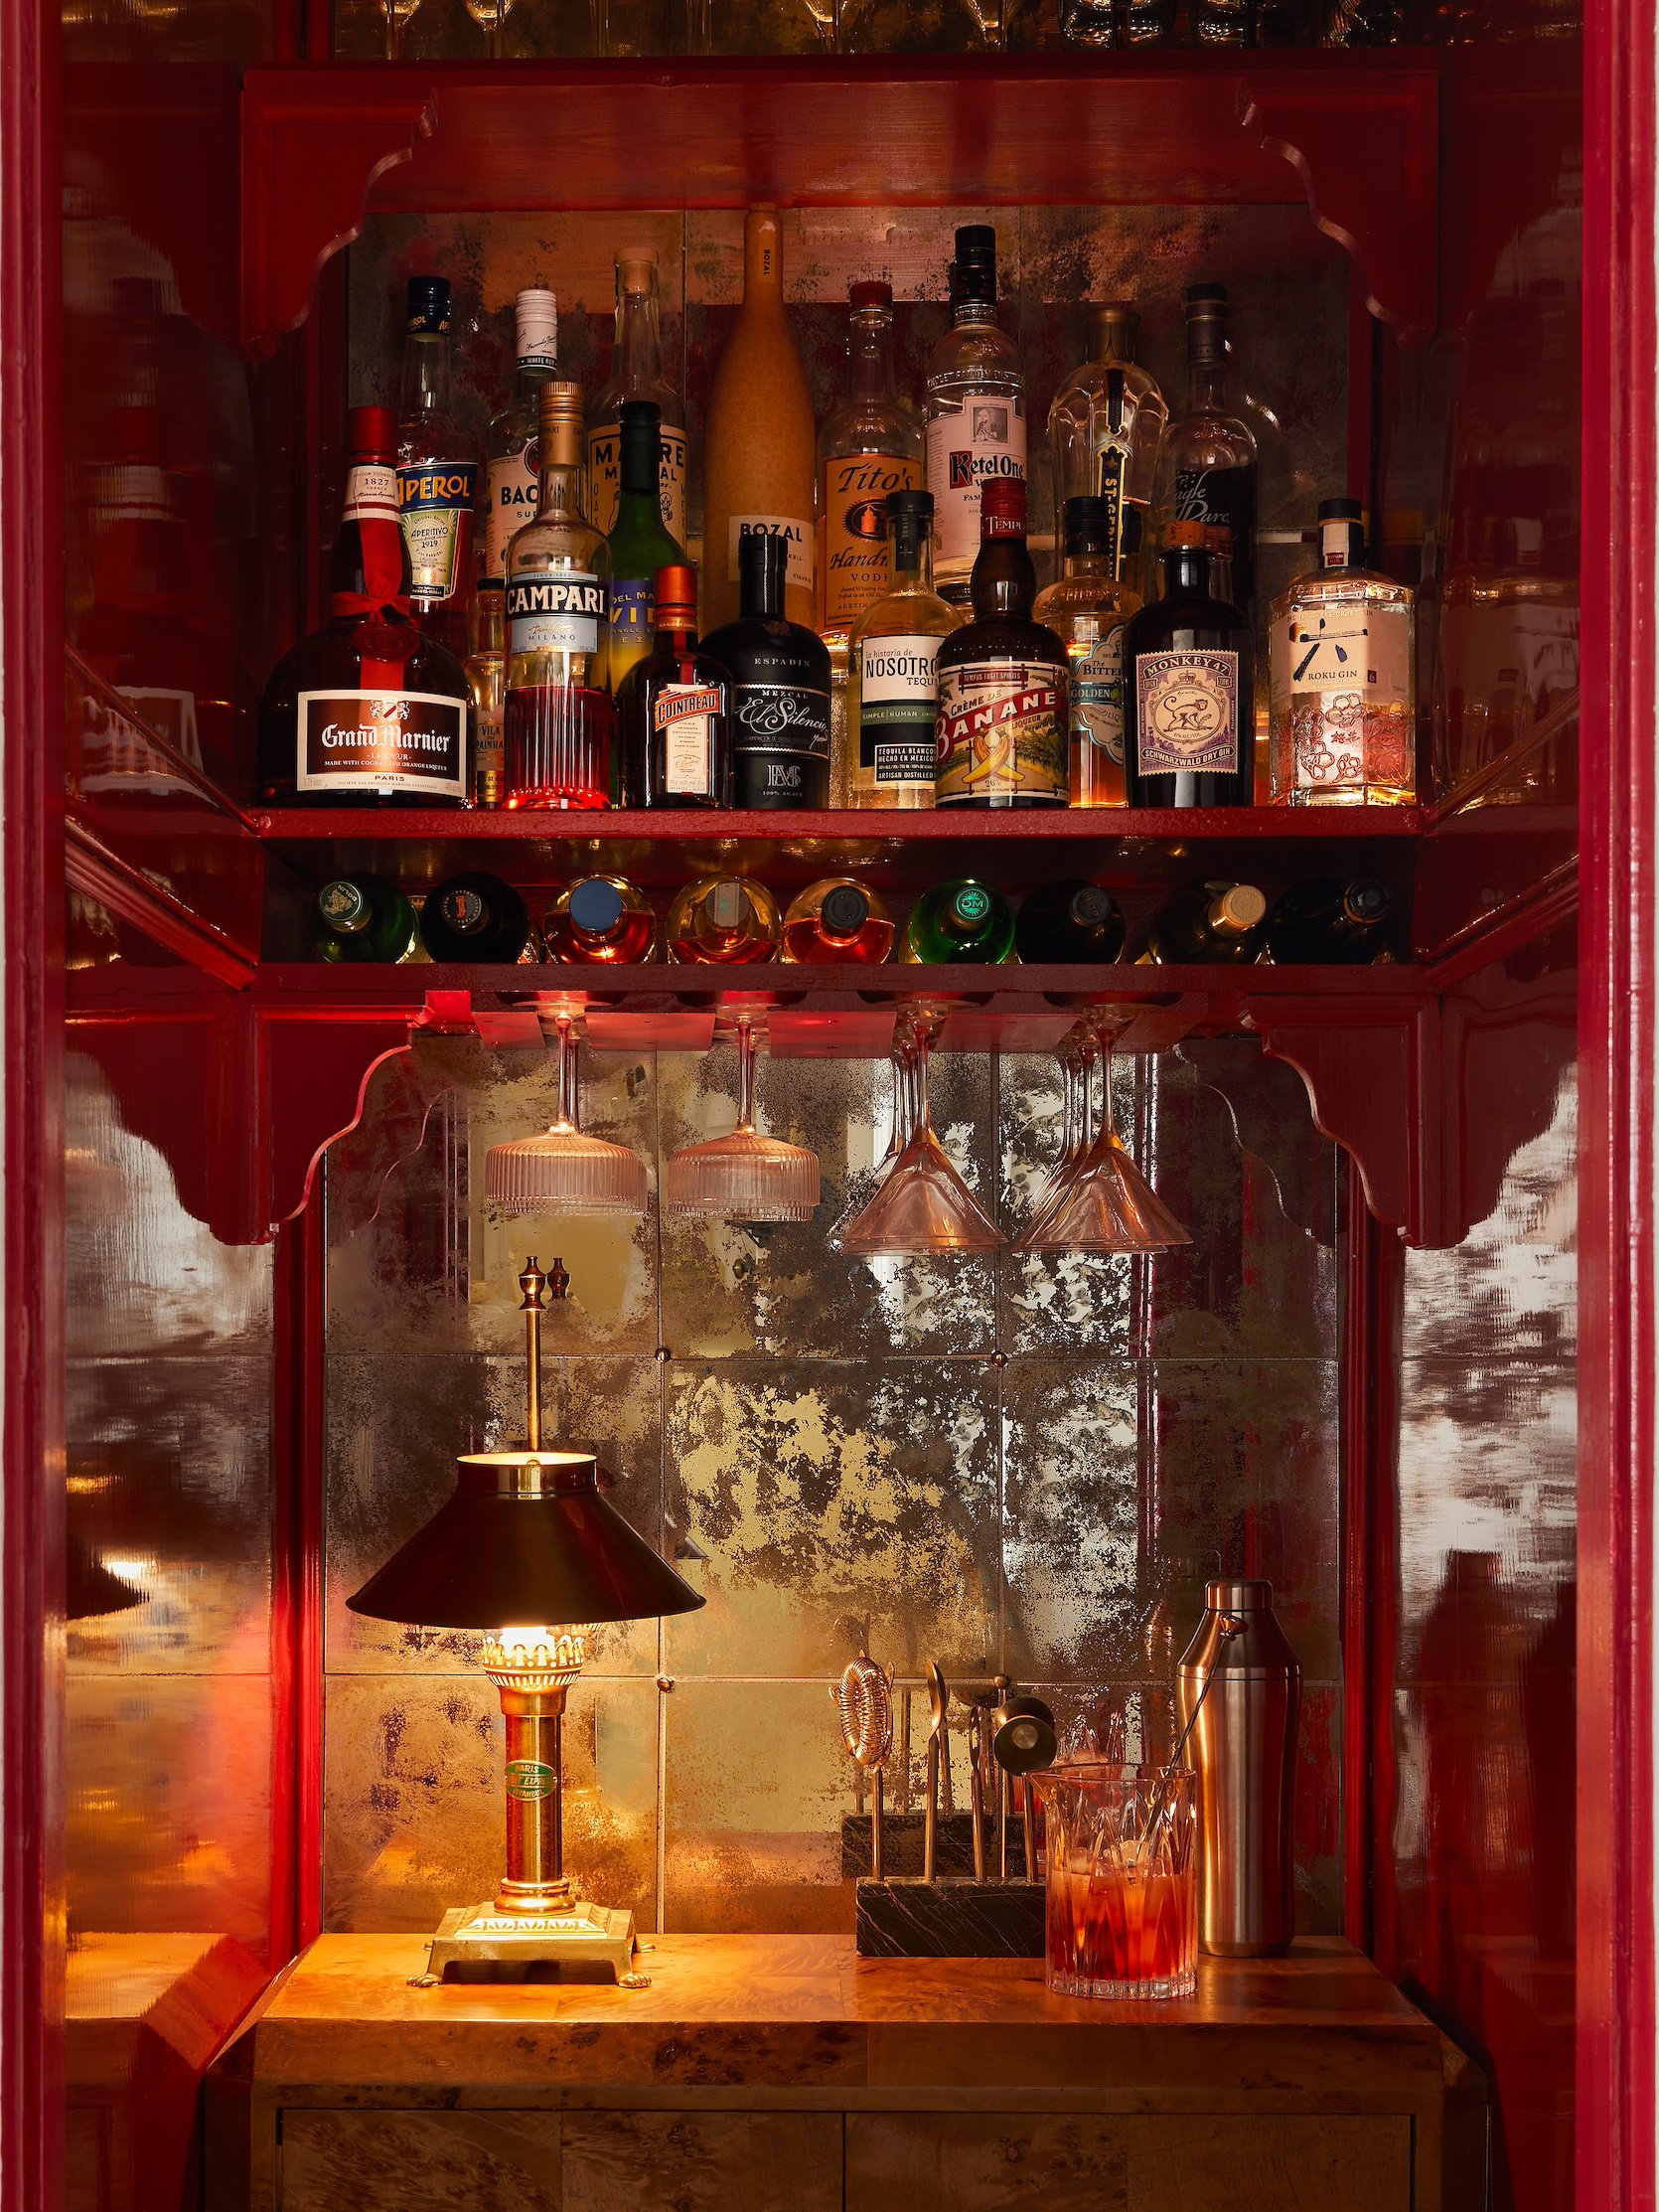
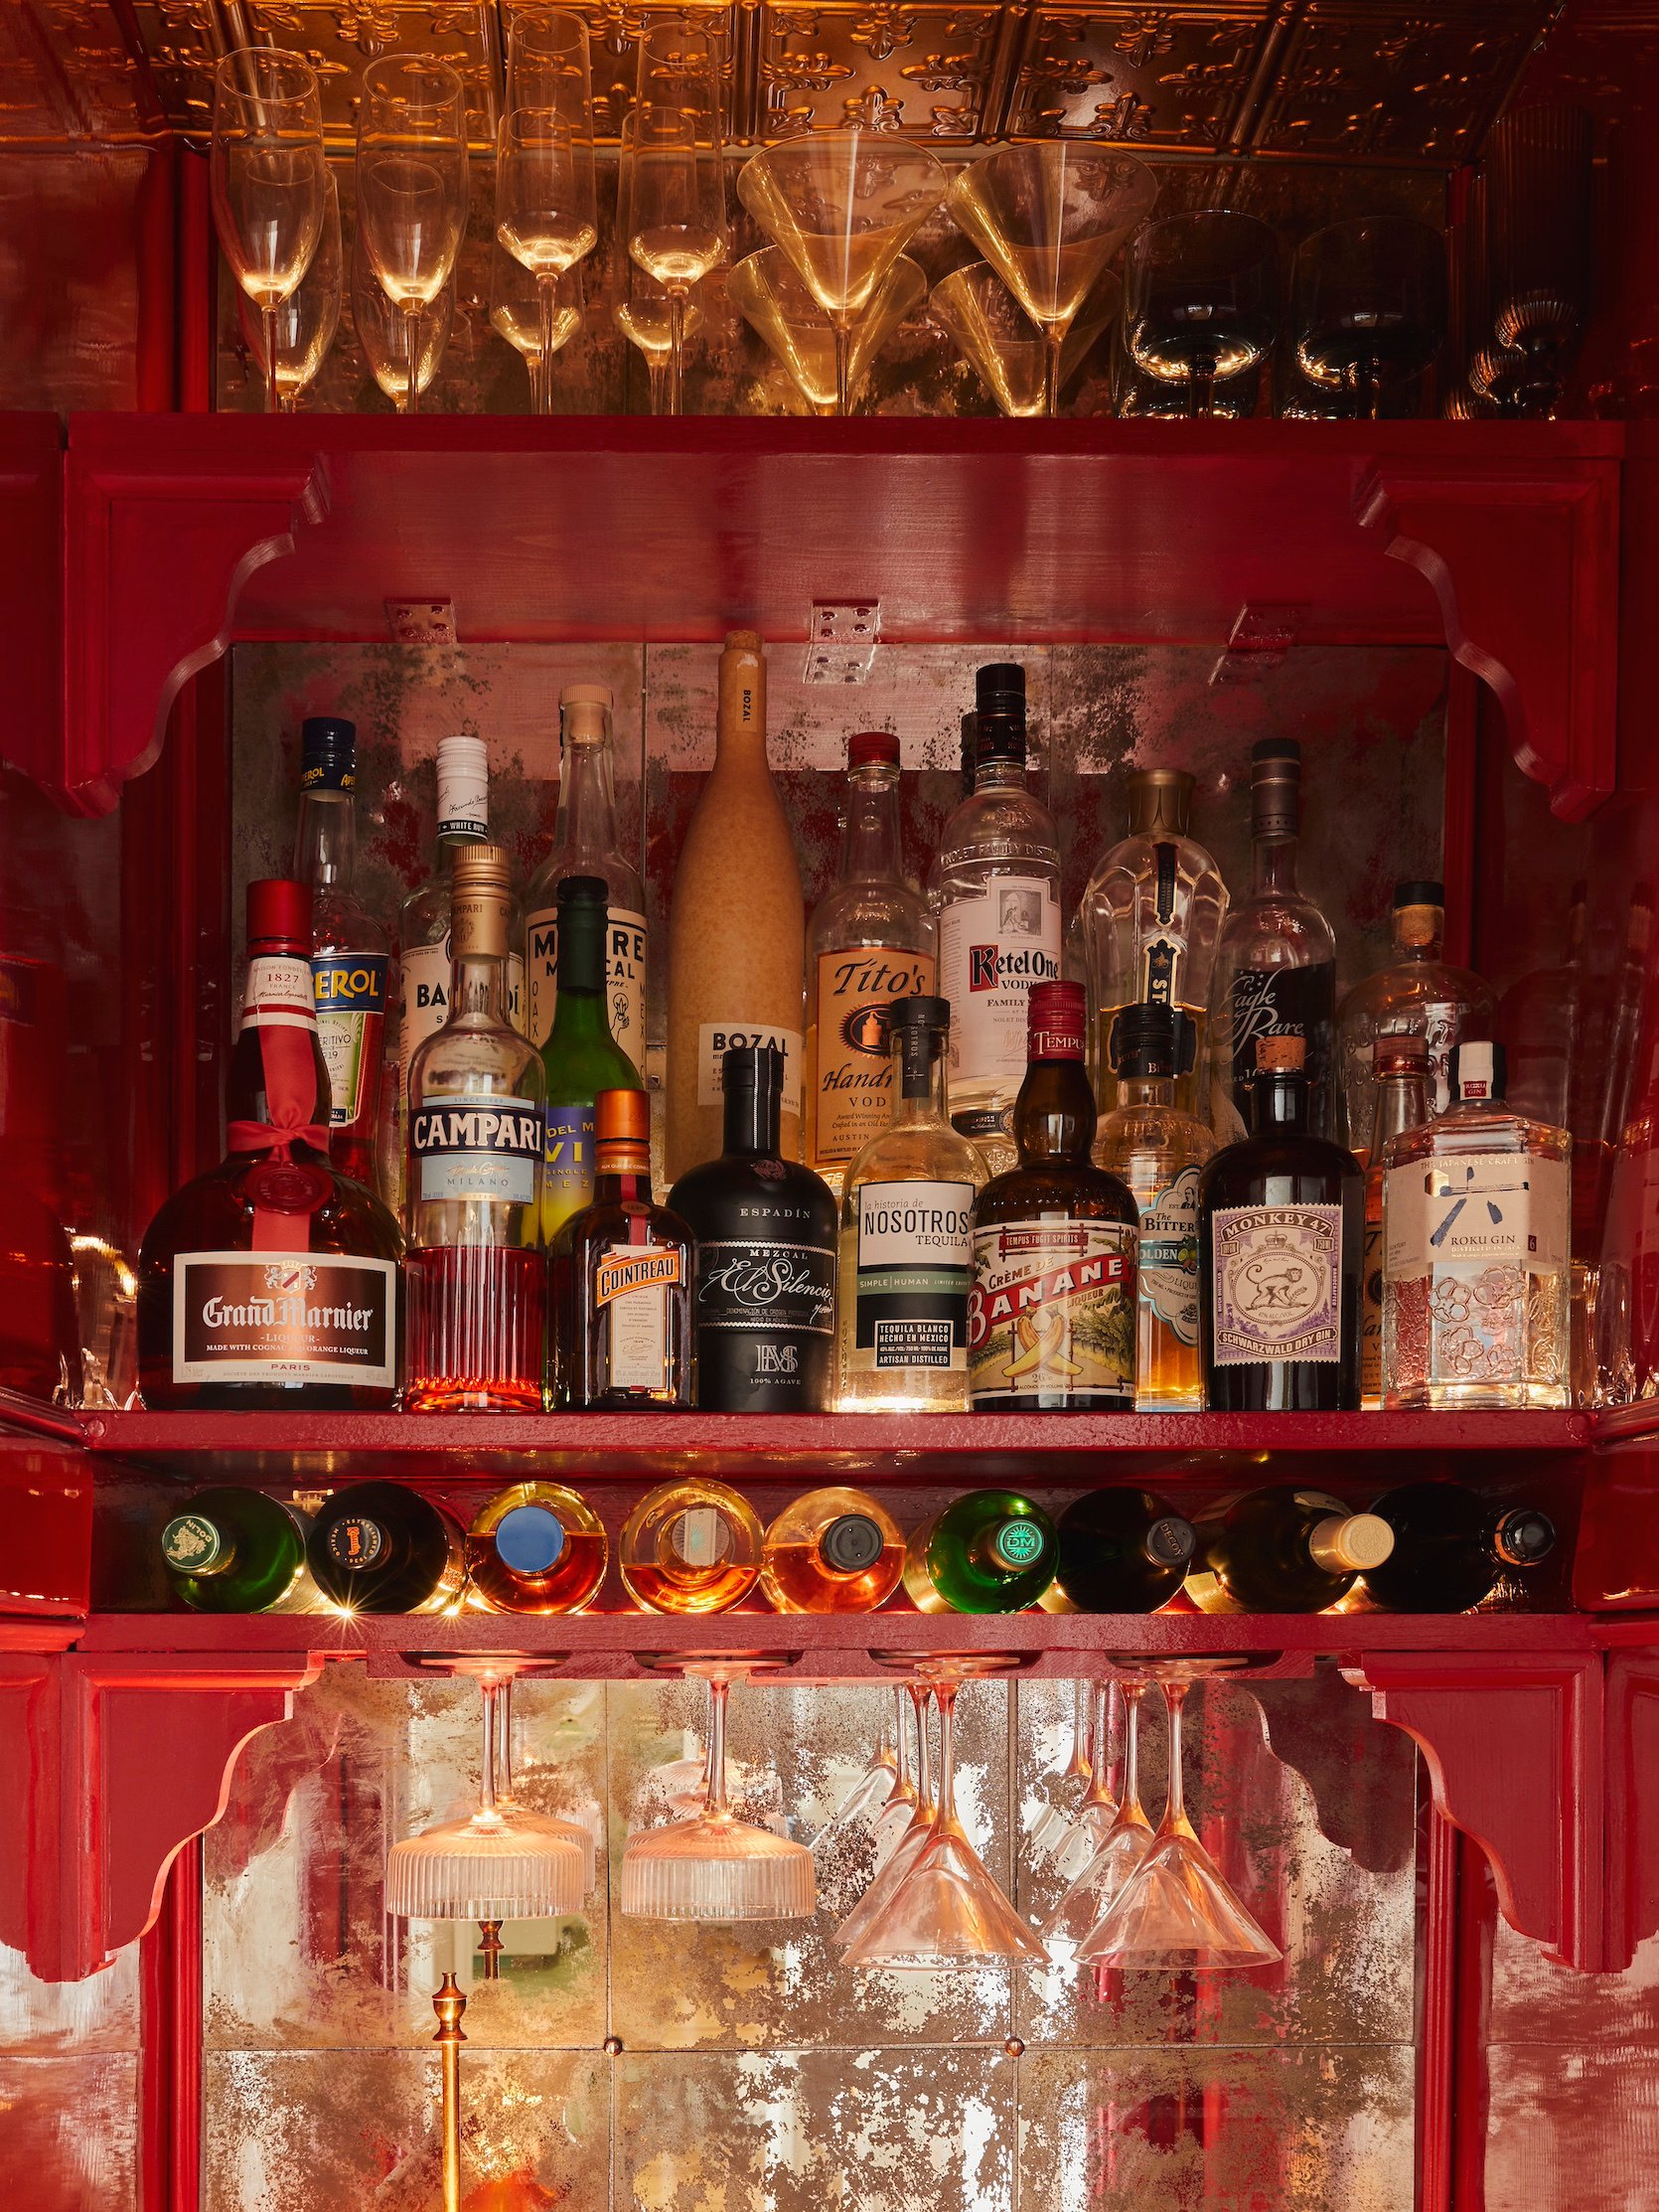
I’ve always had an affinity for high gloss, lacquer walls, and I knew that was going to be the best way to make this tiny space feel larger and to bounce the light around. So I started experimenting with ways I could create that look, knowing full well that it’s not a renter-friendly, easy, or affordable solution. There are a ton of vinyl peel-and-stick wallpaper options, but they’re not super wide. I thought the seams might make the space look cheap, so I ended up finding a patent leather fabric and stapling it to the walls (and then I covered the staples with trim so it’s super seamless). I ordered 8.5 yards because I initially did the door as well, and the total was $250 for all the fabric. At $30 a yard, this was SO affordable, looks super high end, and beats a lot of wallpaper pricing out there, let me tell ya! The staples will be a thing to get out, but not impossible, and honestly, I doubt I’m going to take this down. The next tenant will probably be pumped to have this bar, so I’m definitely going to try to leave it if I can! Surprisingly, though, everything in here can be removed with almost no damage to the closet. I kept the rod as well, so I can put it back on the closet rod sockets like it was never touched.
Okay, enough waiting, let’s take you deeper into this closet speakeasy, shall we??
Lamp | Cocktail Stirring Glass | Coupe Glasses | Cocktail Shaker | Martini Glasses | Wood Brackets | LED Light Strips | Wood Cocktail Glass Holder | Patent Leather Fabric | Mirrors
So, as I briefly mentioned above, we chopped off the closet rod in about 5 seconds with this powerful tool my boyfriend, Austin, brought over. Then we proceeded to install shelving (which I’ve never done before, but it needed to be SUPPORTIVE because of all the bottles and such that would live on here). We used these objectively ugly but super supportive brackets to hold up the back of the bookcase (I covered most of them up with the mirrored backsplash, but you can see a bit of them on the bottom of the top shelf – we photoshopped them out in some of the photos but see the photo below where I left them in), and then we used these pretty wood brackets to support the front of the shelves.
I found the perfect wood cocktail glass holder for under this shelf and painted everything a color-matched red to the patent leather walls. I’m very obsessed with the look, especially with the way the brackets frame these glasses. I love me some glassware, so this was honestly critical for storage purposes!
And then I also added battery-powered LED light strips to the shelves and these acrylic shelves to lift the bottles up and have the light shine through – the closet had no light, so this made a huge difference!
Acrylic Shelves | Coupe Glasses | Cocktail Shaker | Martini Glasses | Wood Brackets | LED Light Strips | Wood Cocktail Glass Holder | Ceiling Tiles | Mirror Buttons | Mirrors | Blue Coupes
This shot above is the only one where you can kind of see the ceiling – which is really where my Parker Palm Springs wine bar inspo shows off the most! I ordered 9 of these tiles and then hung them up with command strips and they’re a dream! They really make the whole space.
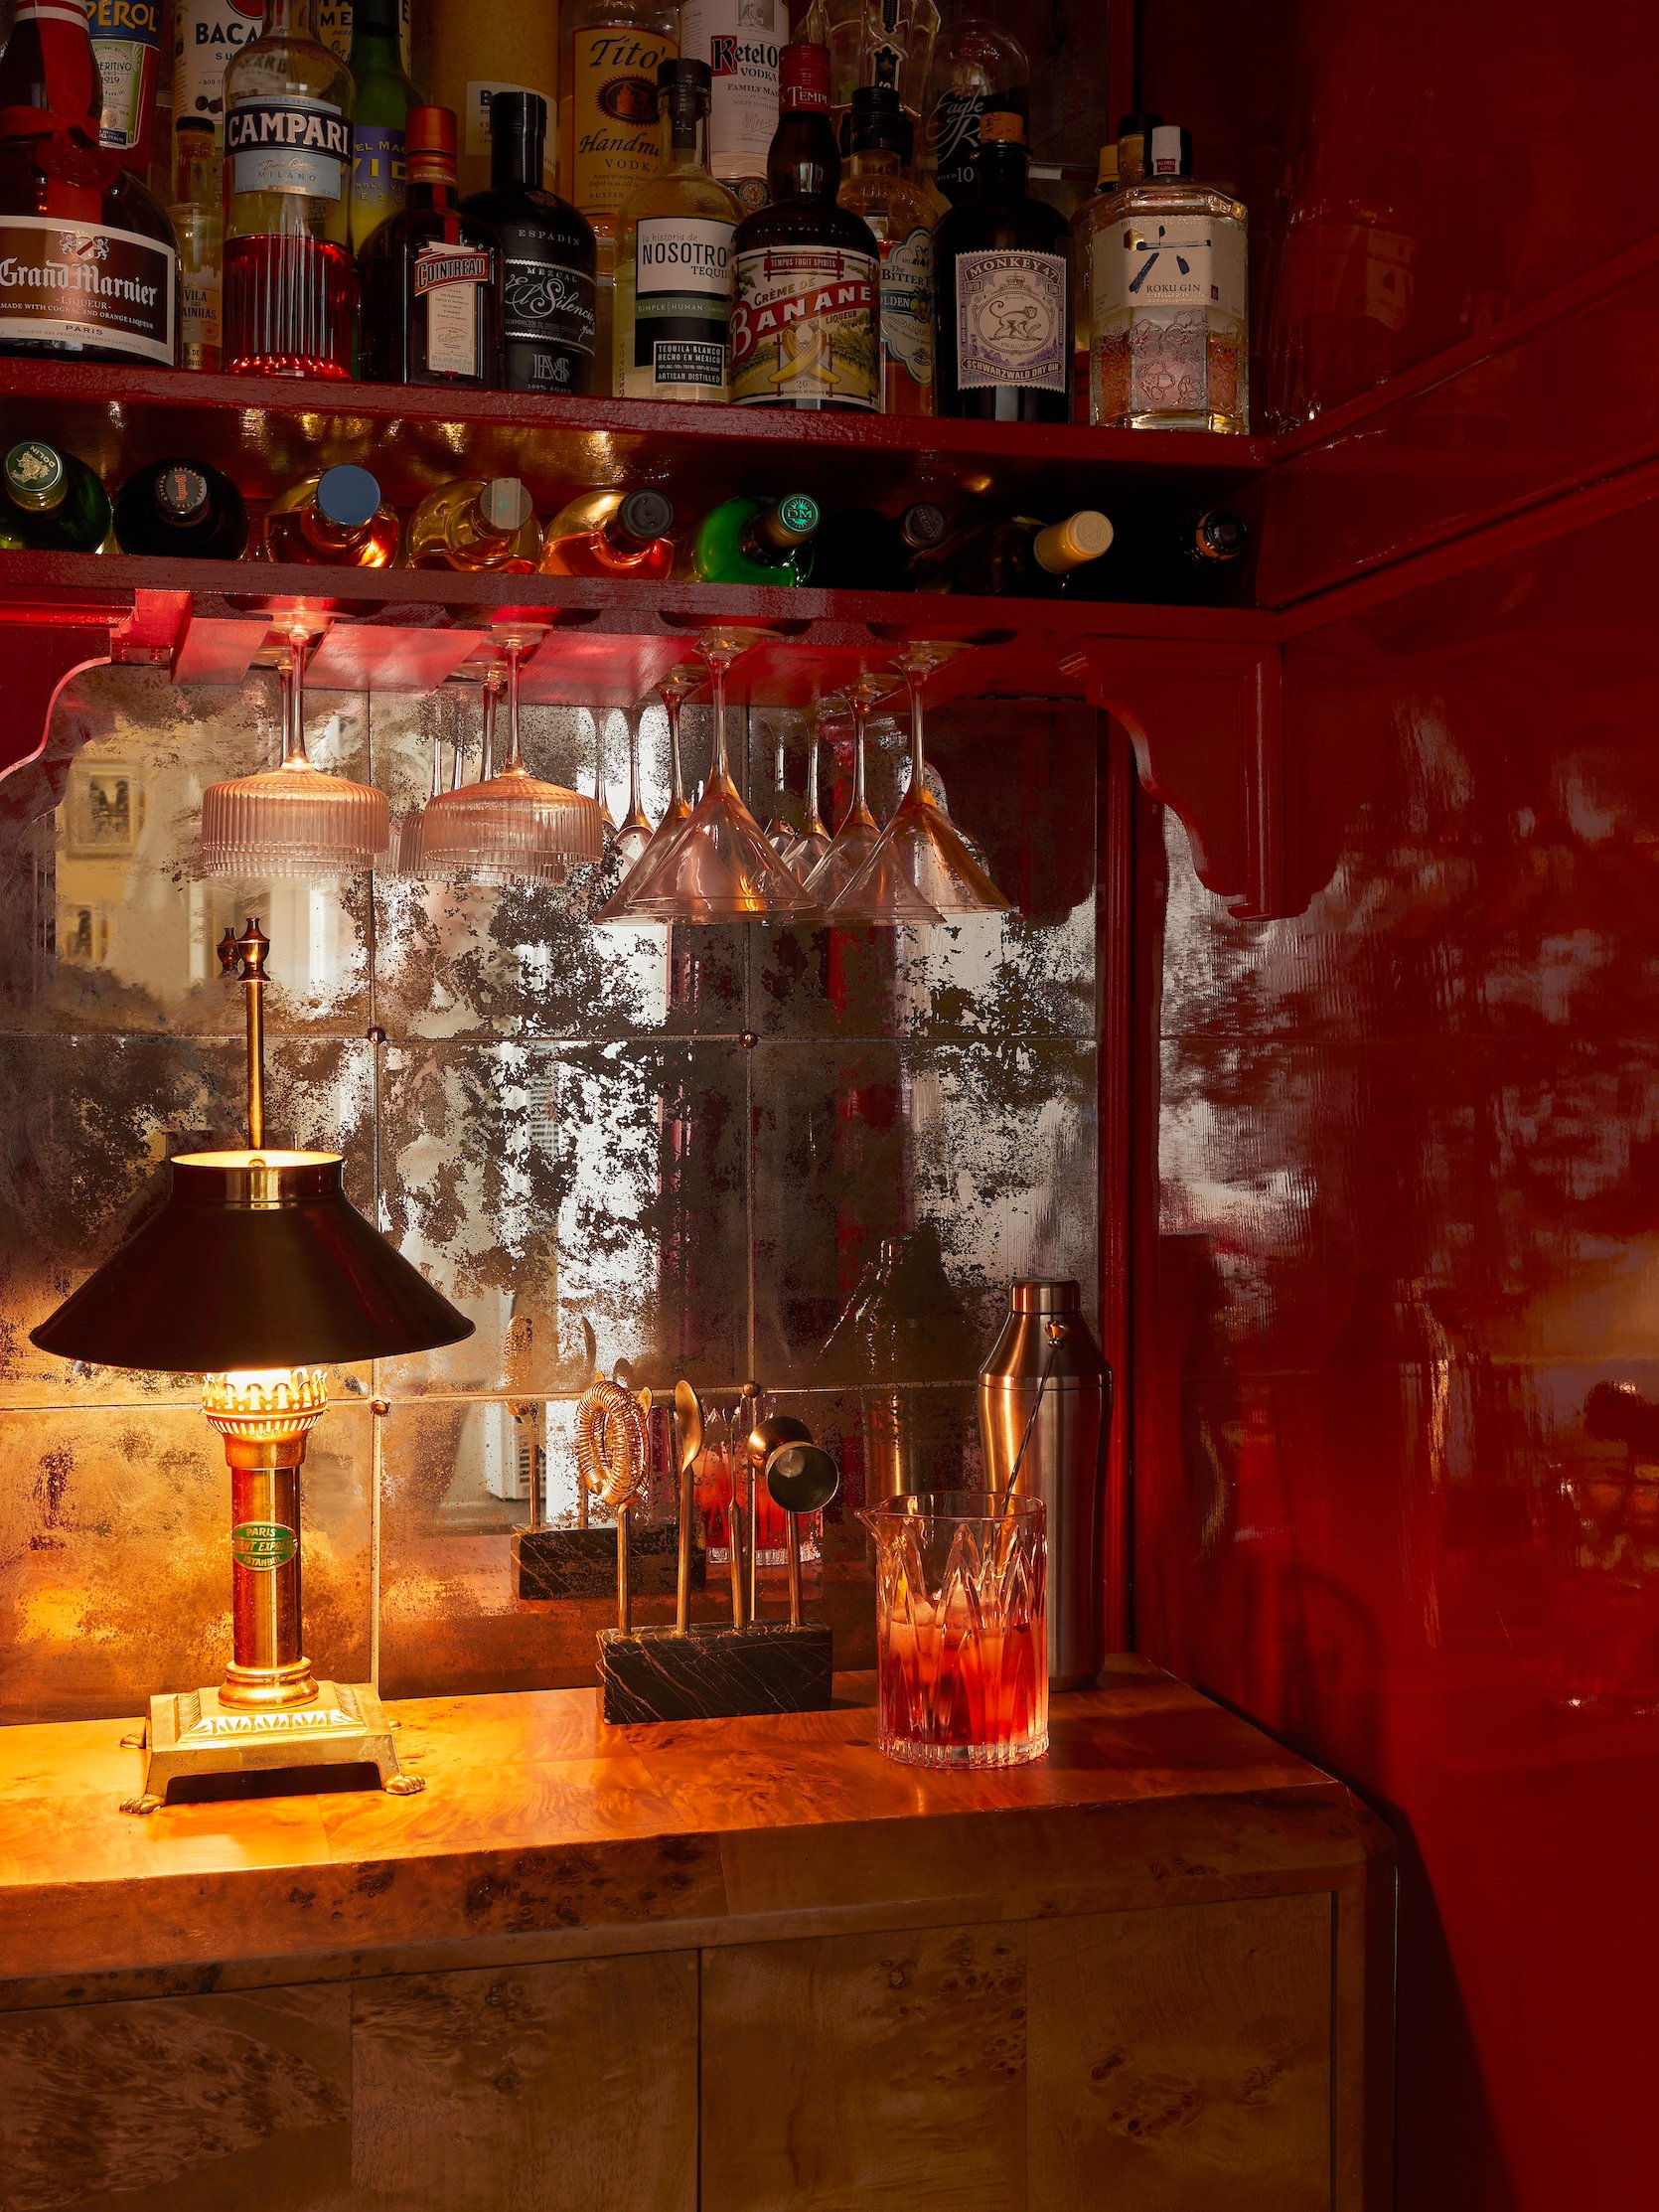
Lamp | Cocktail Stirring Glass | Coupe Glasses | Cocktail Shaker | Martini Glasses | Mirror Buttons | Mirrors | Cocktail Tools (unavailable)
Okay, let’s talk about the mirrored backsplash! I was looking into ordering real antiqued mirrors, but let me tell you – they cost a pretty penny. I really wanted to save on the backsplash since I wasn’t going to take this space with me, so I found these mirrors in a pack of 12 for $25. I ordered two packs and some spray paint and got to work! I followed Lone Fox Home’s technique (go 12 min into the video!) which is to layer this spay paint, then this and this, and then dab on alcohol ink, and it worked really well but I oversprayed it a bit, so I used nail polish remover to bring some of the reflectiveness back in and I LOVE how it turned out. Okay, now it’s time for the cabinet saga…
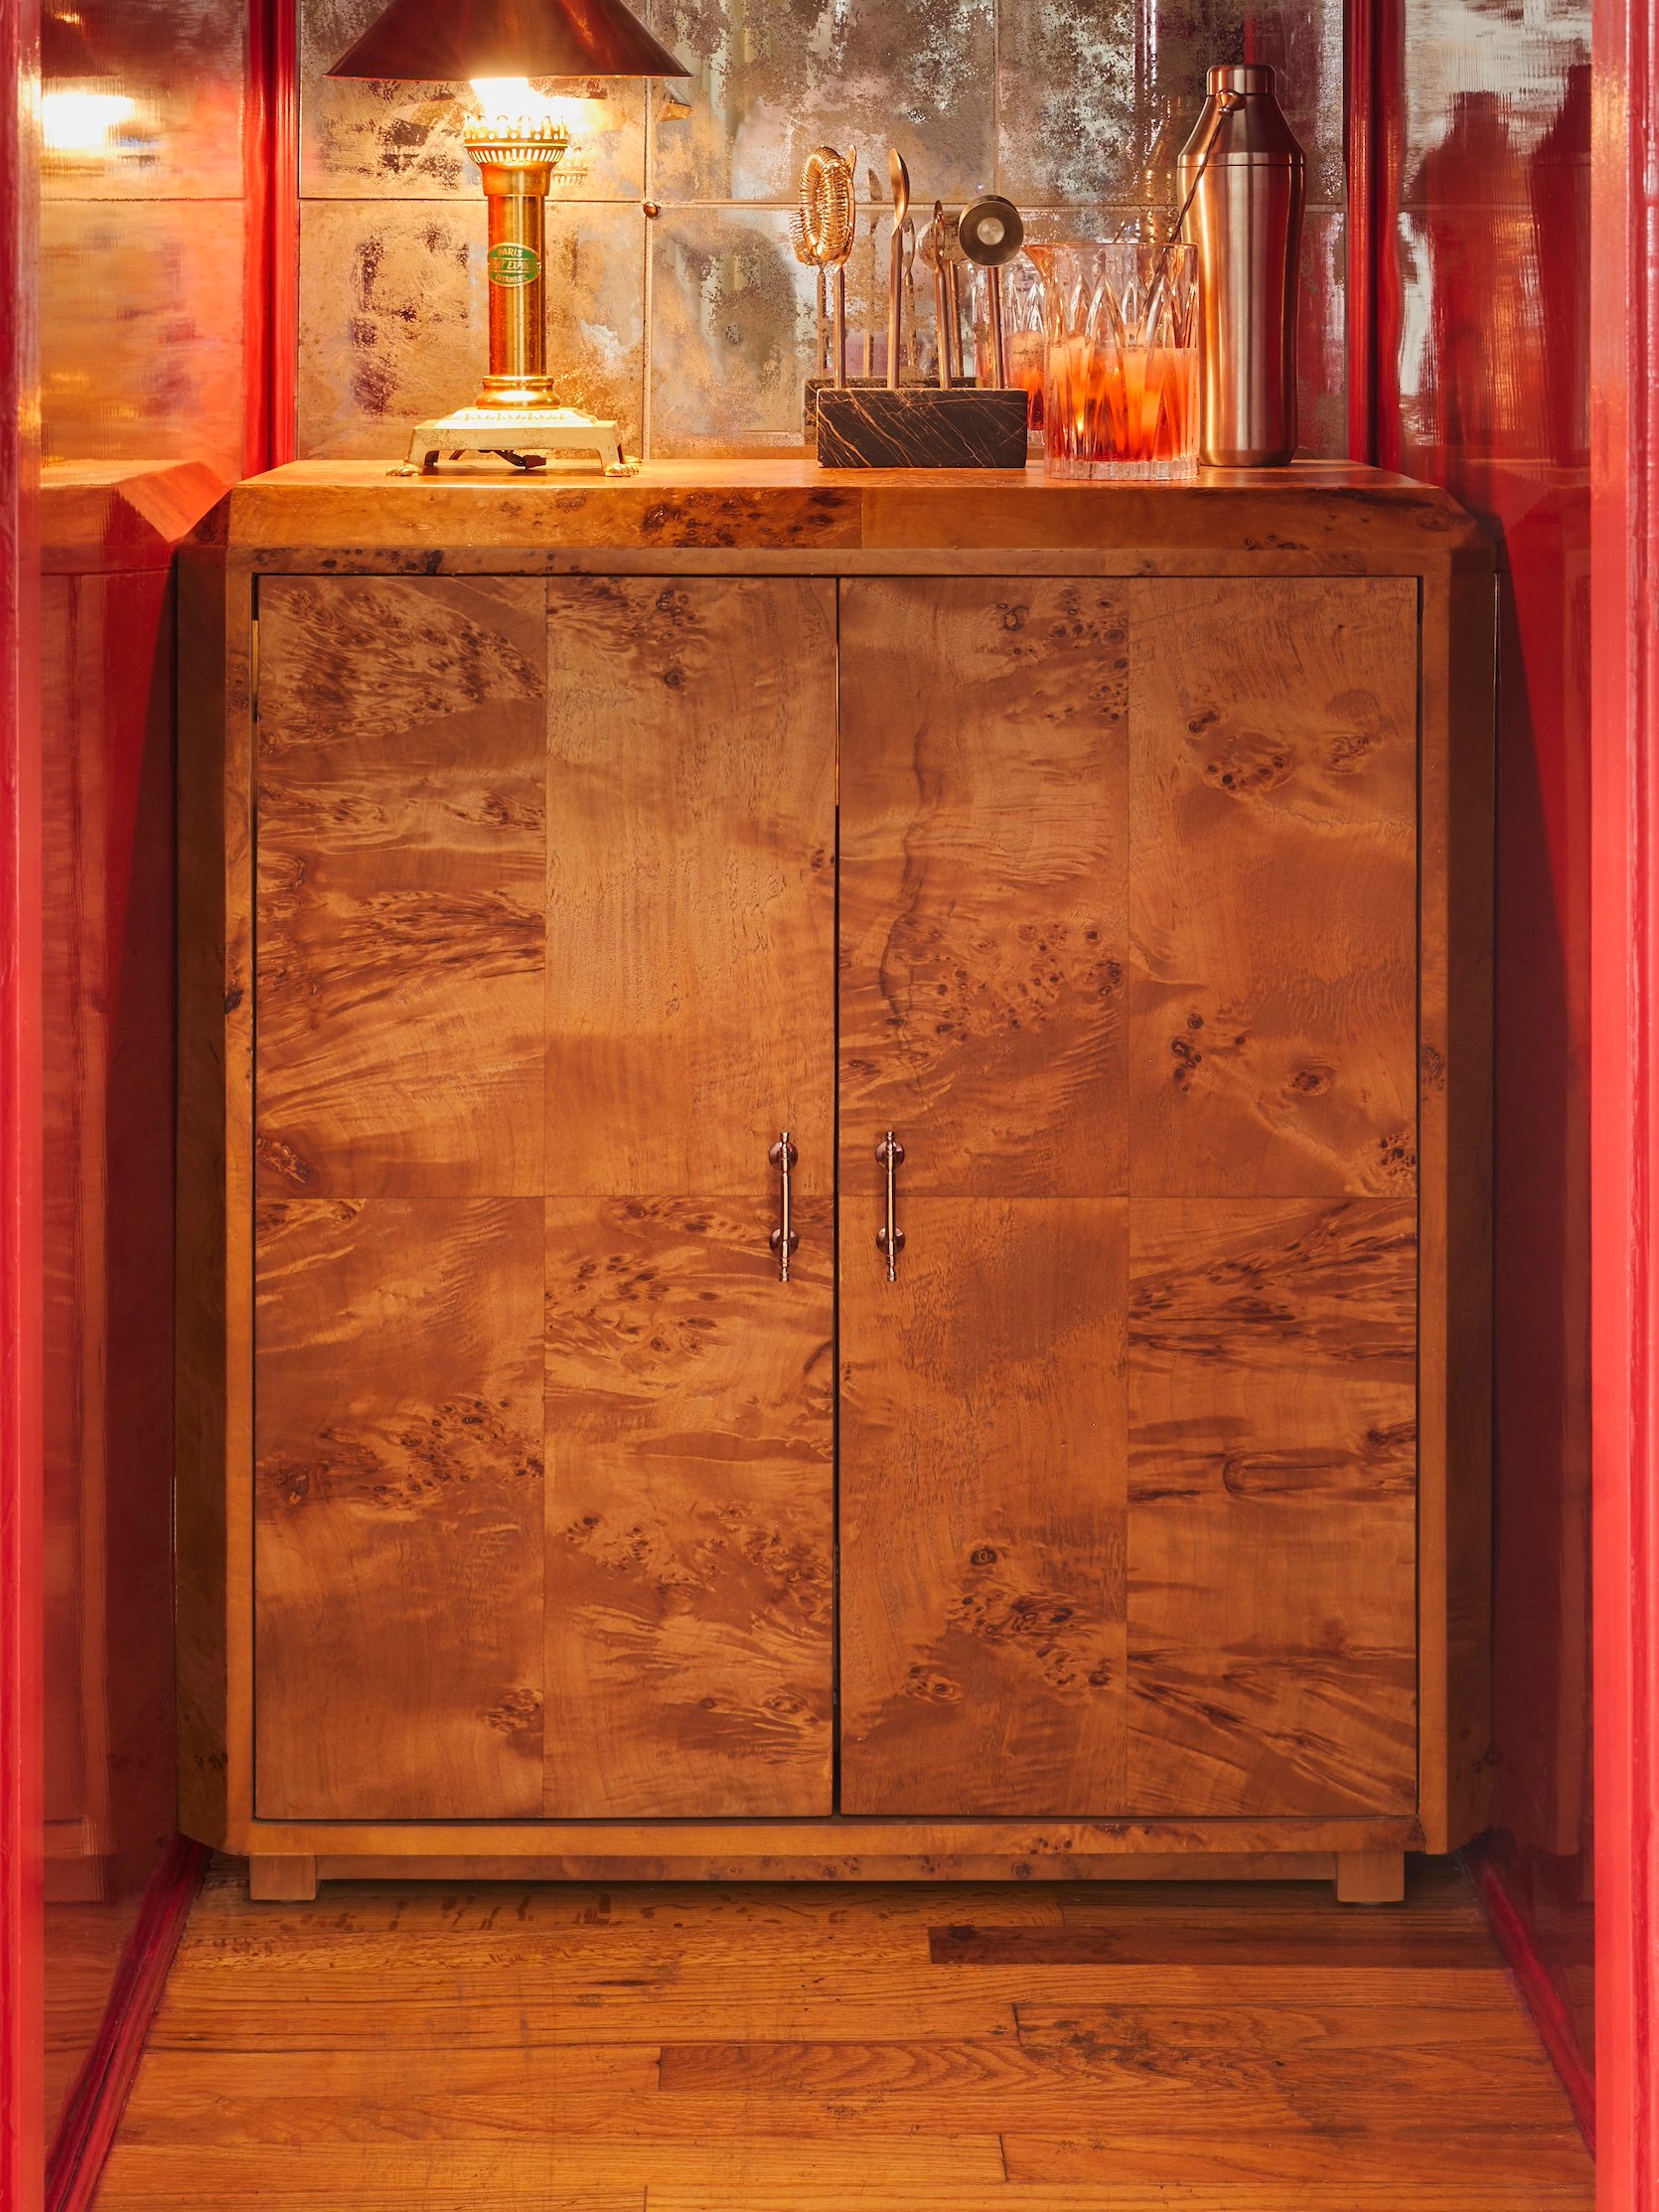
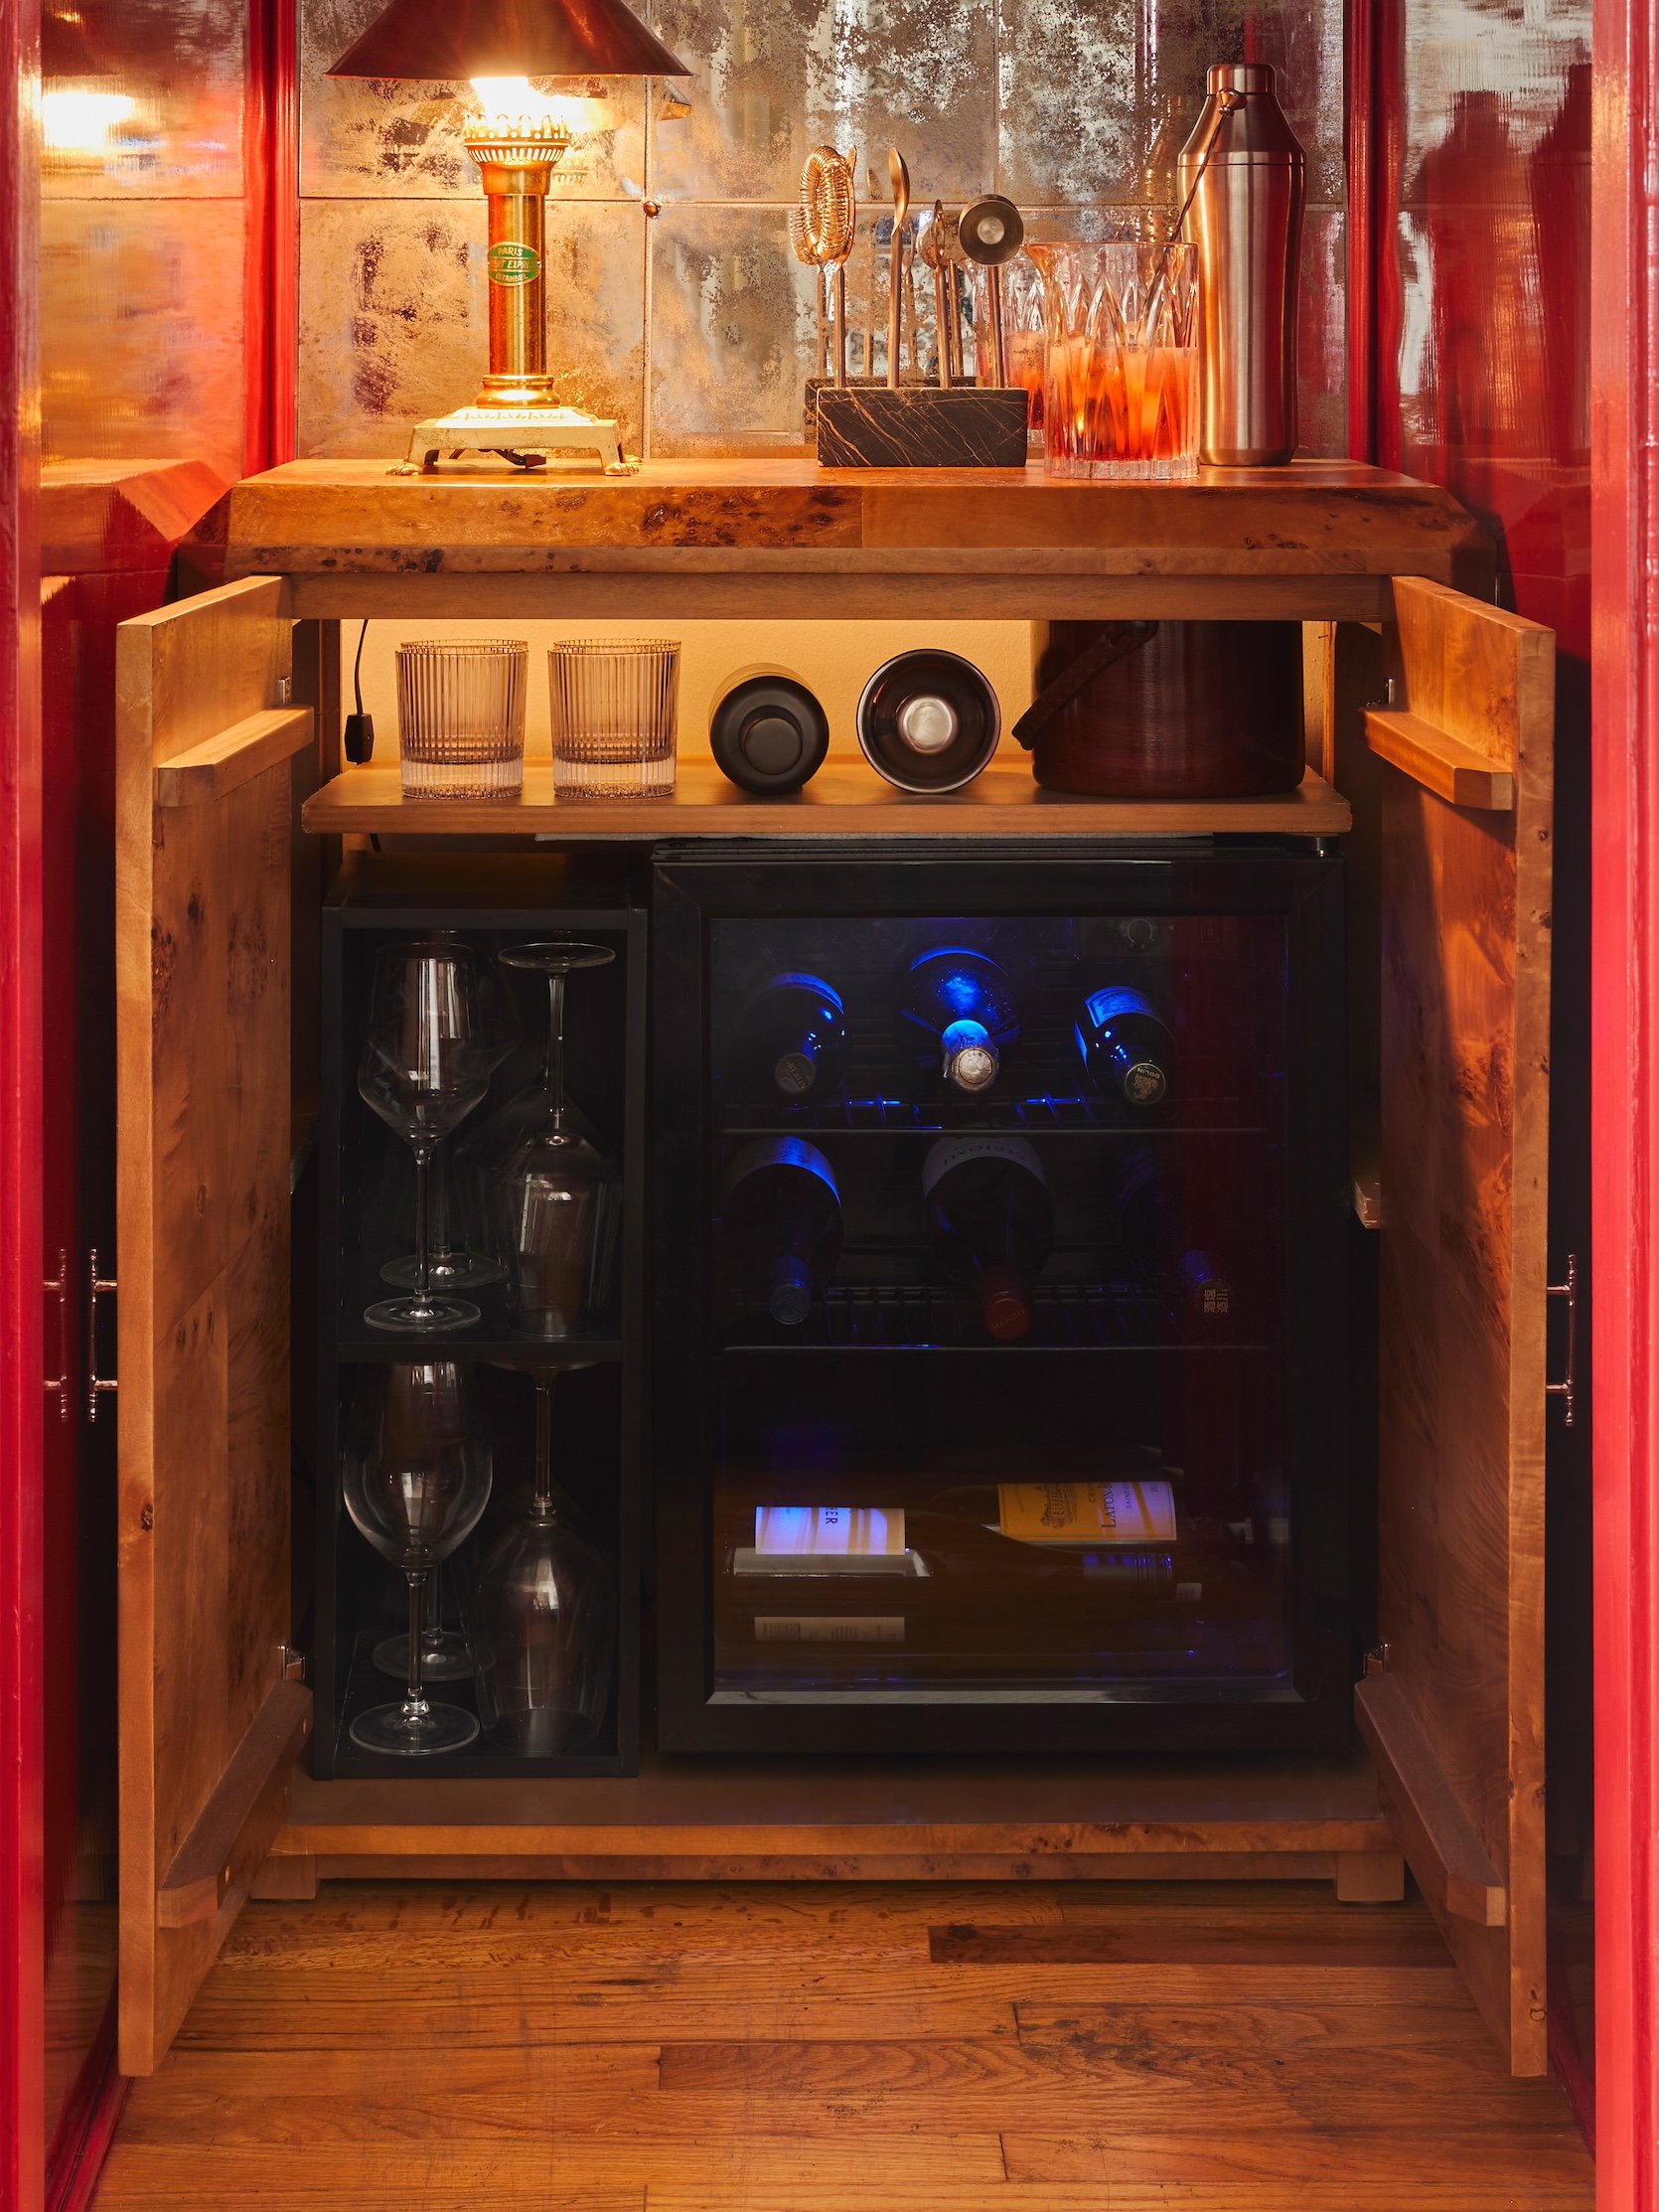
Cabinet | Wine Fridge | Wine Glass Cubby
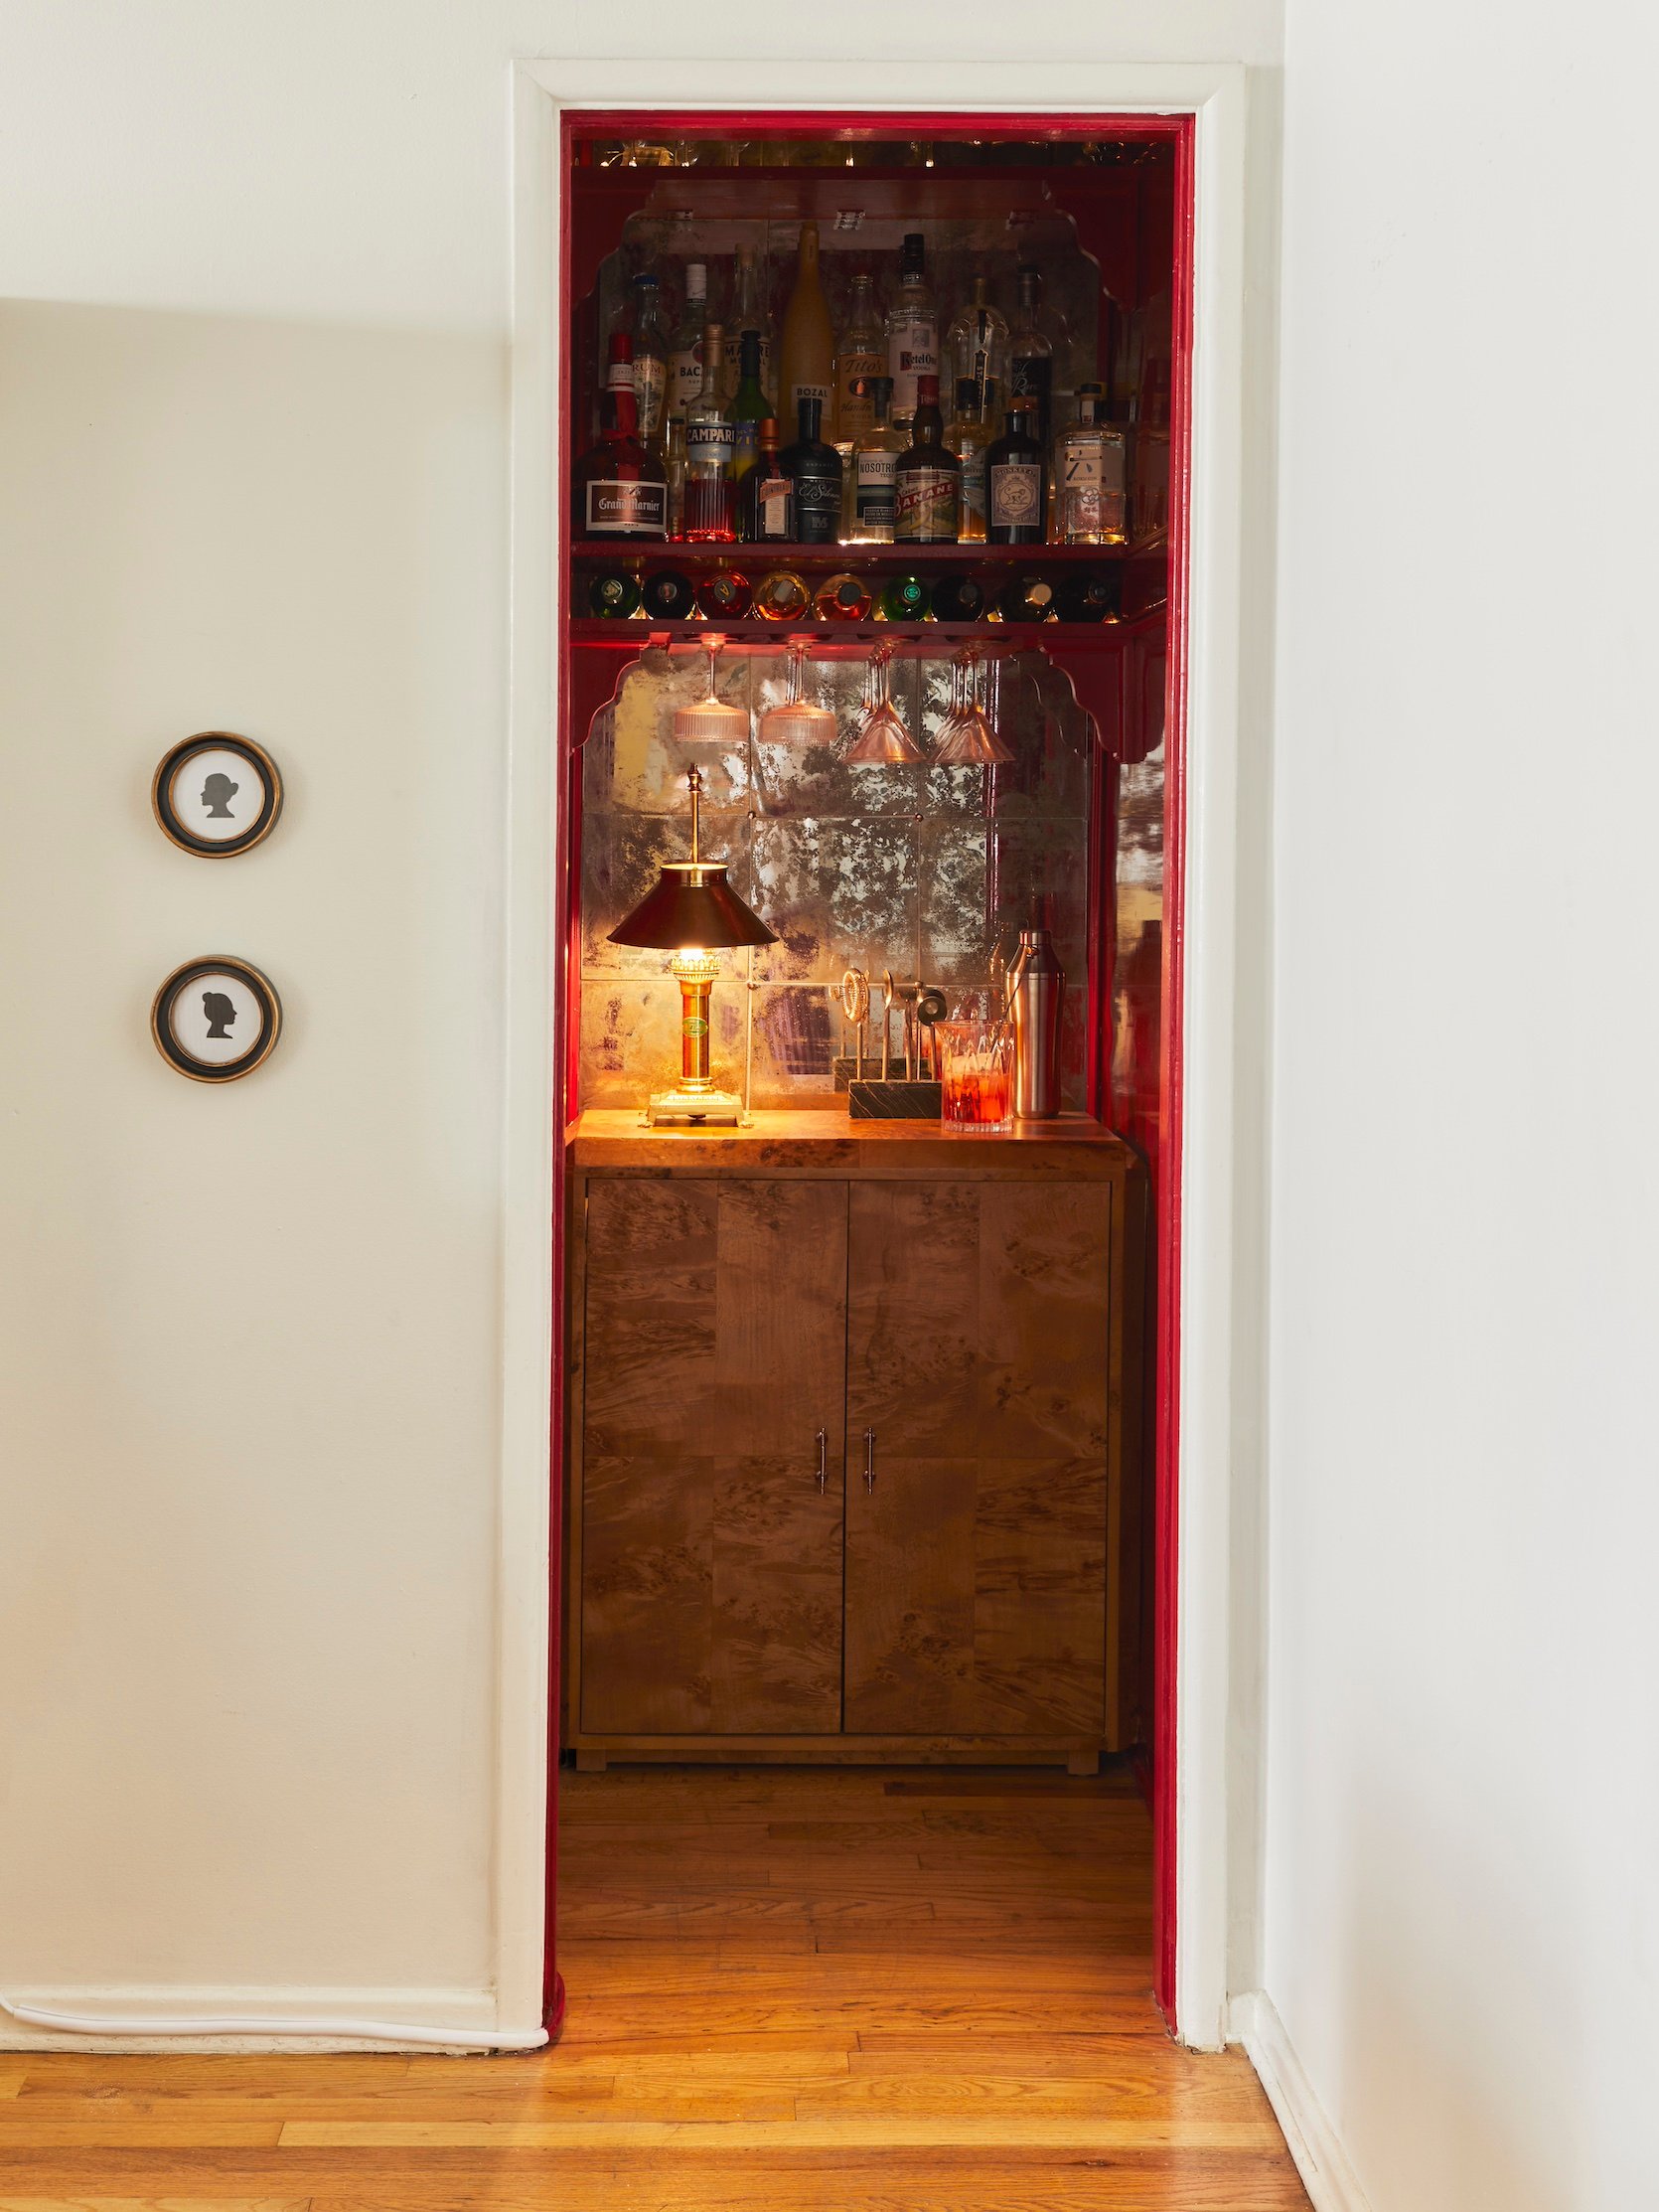
Okay, getting this cabinet in here was so hilarious. Let me explain. So I found this gorgeous burlwood cabinet that was the EXACT width of this closet, and since it was from Home Depot, I was like…this will definitely come in pieces and I’ll install it inside the closet when it shows up, and it will be perfect. Well, it most definitely did not come in pieces – this thing came BUILT. AND SHE WAS SOLID. But I was determined to disassemble this bad boy and get it in the closet. So I enlisted Austin to come over and help me cut into it with some of his fancy power tools (dating me is awesome, BTW). You guys, this thing would not budge. We took out every screw we could find, hacked away at it with a saw, and nothing. For two straight days, I tried breaking it apart, and everyone was starting to think I was insane. The definition of insanity is doing the same thing over and expecting different results, and I was certainly at that point until I took a handsaw straight to the side of the wood and snapped this thing into two (cleanly and nicely, though). It was actually crazy. BUT this guy fit so perfectly in here that I reassembled it inside and hammered it in so it’s perfectly tight and secure. Like this thing is going nowhere, and you would never know the frankensteining I had to do to make it work. So, if you’re in the market for a burlwood cabinet that’s high quality at an affordable price point, might I recommend this one? It’s nearly impossible to break or rip apart lol.
And then case you haven’t noticed…I’m a bit extra…so obviously I put a wine fridge in here (duh!) It took forever to find one that was tiny enough to fit – and this one was still a bit too deep, so I took the back of the cabinet out and then pulled it one inch from the wall (see here). I ran an extension cord on the left side of the speakeasy and painted the cord cover to match, so you don’t even notice it’s there.
Oh, and then I have one more bonus image for you!! The lamp you’ve been seeing in all the photos is a vintage lamp I found for $10, which was a total steal. I ended up getting gifted my DREAM Louis Poulsen PH lamp (which is objectively one of the coolest things to ever happen to me), so I tried it in here and I LOVE. I had it here for a bit and then put it on the piano in my living room because I feel like it is a bit tall for this space?? Comment your thoughts on which lamp you like more and if the door should be on or off:)
So that’s how the closet speakeasy all went down. Kinda crazy…I know. I don’t do things half-assed, so here we are…

THANK YOU for reading and following along. If you want to see every step of me putting this closet together (including ripping the cabinet apart with my bare hands), you can check out part one, part two, and part three over on my Instagram. I’ll see ya in the comments!
*Design by Mallory Wackerman
**Photos by Sara Ligorria-Tramp
View the original article and our Inspiration here
Leave a Reply