
Jointed warehouse floors typically require repairs during their service life. Some floors require more repairs than others, depending on the design, construction, and exposure conditions, especially floors exposed to small-wheeled forklift traffic. Joint edges of both contraction and construction joints spall (break off) when either the joint filler is no longer protecting the edges from wheel impact, or joints are unstable causing differential deflections between the adjacent slab panels. When wheeled traffic crosses unstable joints, differential slab defections expose joint edges to wheel impacts creating edge damage. Edge damage can increase until joint widths and damage depths interfere with wheeled traffic and smooth operations of the facility.
Below are various repair options for spalled and unstable joints. Prior to performing spall repairs, joints should be checked to ensure stability; otherwise, edge repairs will not last. Joint edge repairs are categorized by the extent or primarily the width of the edge spall damage: Minor, Medium, and Severe.
Minor Edge Spalling
Minor edge chips and spalls can simply be repaired by removing the existing joint filler and refilling the joint reservoir with new joint filler (semi-rigid epoxy or polyurea) allowing the filler material to flow into the edge chips and small spalls. If needed, a thicker sawblade can be used to increase the width of the joint reservoir to either remove or reduce the size of chips and spalls. After removing the filler or widening the joint, thoroughly clean the new joint reservoir. Slightly overfill the joint with the new filler and after the appropriate cure time, shave or grind the filler flush with the floor surface. Be sure the new joint filler was designed to fill and protect joints in industrial floors with a minimum Shore A hardness of 80. Shore hardness relates to the stiffness of the filler. Sufficient stiffness is required to support and protect joint edges from chipping and spalling.
Medium Edge Spalling
Medium edge spalling (up to approximately 1 in.) requires the width of the joint reservoir to be sufficiently enlarged to remove the edge spalls. Use special joint widening blades or multiple blades with or without spacers to enlarge the width of the joint reservoir to cut away the edge spalls and form a new “T” shaped reservoir. When using multiple blades, the center blade should cut to the depth of the original joint. For outer blades, the depth of the sawcuts should be about 1/2 in. to 3/4 in. Depth of the joint should be the original joint depth or a minimum of 2 in. for a thru-slab joint (i.e., construction joint).
Next, thoroughly clean the newly formed reservoir and slightly overfill with joint filler. After the appropriate cure time, shave or grind flush with the surface of the floor. Be sure the new joint filler is appropriate for the total width of the new joint reservoir. Manufacturers usually provide directions for adding dry silica sand to modify standard semi-rigid fillers to accommodate wider joints. It is critical the repair is flush with the surface of the floor so wheeled traffic travels smoothly over the repair.
Severe Edge Spalling
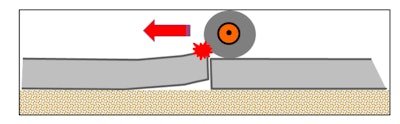
For severe edge spalls with joint widths exceeding 1 in., measure and uniformly sawcut parallel along the joint to encompass edge spalls. Sawcut depth should be about 1/2 to 3/4 in. as illustrated below to create joint shoulders. Next, chisel out the damaged concrete between sawcuts using a light chipping hammer creating joint shoulders. Thoroughly clean out the new joint reservoir and fill the sawcut below the shoulders with dry silica sand and slightly overfill the reservoir with a structural repair material designed for rebuilding joint shoulders in industrial floors.
After curing, grind the structural repair material flush with the surface and reinstall the sawcut completely through the structural repair material. Restoring the sawcut allows the joint to open/close minimizing the risk of future slab cracking. Depth of the joint should be equal to the original sawcut depth or at least 2 in. for thru-slab joints. Clean out the sawcut, remove the sand, and slightly overfill the joint with a semi-rigid joint filler. After the appropriate cure period, shave or grind the joint filler flush with the surface of the slab.

Manufacturers of joint repair products have varied materials, recommendations, and techniques to repair minor to severe joint edge spalling. Be sure to read the directions, especially, how to prepare the joint reservoir and follow the manufacturers’ instructions. If questions arise, get help by contacting a technical representative for the product.
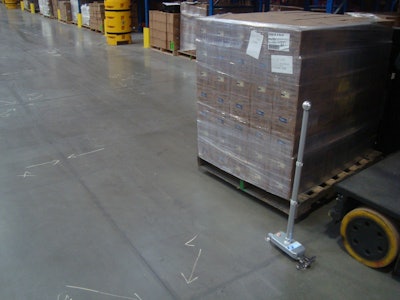 Differential joint deflections can be measured using a floor profiler as a moving forklift passes over the joint. KB Engineering LLC
Repairing Unstable Joints
Slab curling is a common phenomenon for slabs due to a differential moisture gradient between the top and bottom of the slab resulting in differential concrete shrinkage. Differential top and bottom concrete shrinkage cause slabs along joints to curl upwards leaving a void space beneath the slab. Like placing a sheet of plywood on the ground and exposing the top side to the sun; edges curl upwards. When forklifts cross curled joints, differential deflections of the adjoining panels expose the leading joint edge to wheel impacts. Unstable joints should be stabilized before repairing edge spalls; otherwise, the repair will fail prematurely due to the continued wheel impacts.
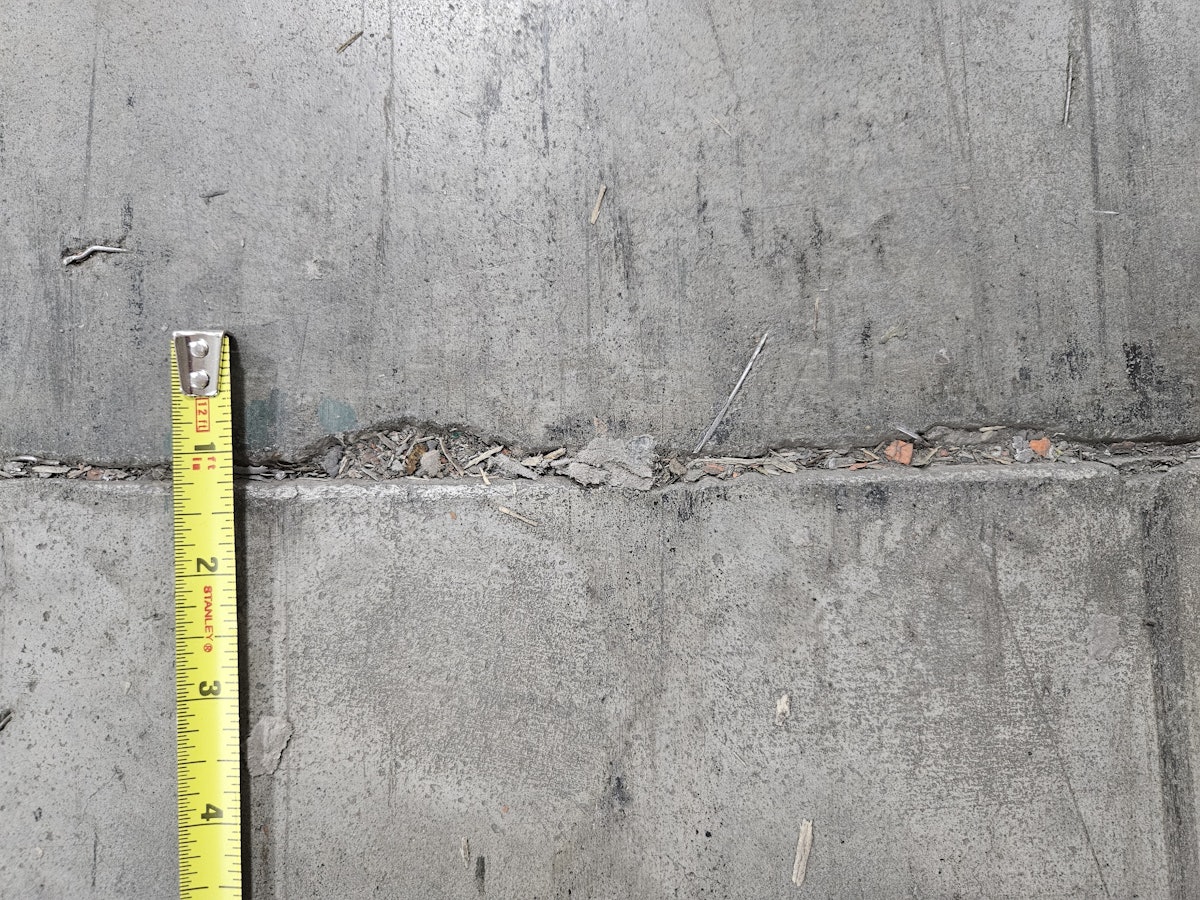
Evidence of unstable joints are joint edge damage, joint clicking or banging as forklifts cross joints, scrapes and black tire marks along the curled portion of the panels. Also, “sounding” the slab with a heavy hammer can identify the extent of the edge and corner curl by revealing the portion of the slab that has lifted off the base. Typically, the curled portion will extend 1 to 2 ft perpendicular from the joint. Sounding consists of striking the concrete with a heavy hammer (e.g., 3 lb) and listening to the resulting sound. A hollow sound indicates the slab has curled or lifted off the base.
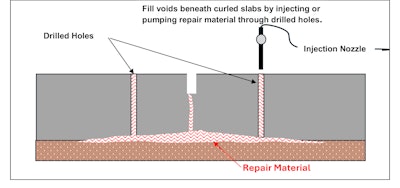
Filling the voids beneath curled slabs along joints and then grinding joints flat to remove bumps associated with the curling is the best repair option. After stabilizing joints, repair edge chipping and spalling using one of the techniques described above.
Joint stabilization starts with sounding panels to estimate the extent of the slab curling. Next, establish a hole drill pattern based on the void areas and the manufacturer’s recommendations for the material and equipment being used. Then, fill the cavities beneath the slab along the joint by injecting an expanding polyurethane foam or pump a flowable mortar through drilled holes along the joint. After curing, the repair materials will harden and support the slab to eliminate slab deflections.
After filling the voids beneath the slab, repair the drill holes using a product especially designed to repair holes in industrial floors. Then grind the joint flat and if needed, repair the joint using one of the spall repair techniques described above and refill the joint reservoir. Stabilizing joints will help prevent continued joint edge deterioration and extend the service life of joints, especially edge repairs.
For unprotected and/or unstable joints, the rate of edge damage increases with exposure, especially when exposed to wheeled traffic with small, hard wheels. Therefore, performing repairs sooner rather than later will help minimize the extent and cost of joint spall repairs.
View the original article and our Inspiration here
Leave a Reply